Snowflake Plugin Available NOW on VSCode

Snowflake Plugin Available NOW on VSCode:


We have great news! Snowflake has released its own VSCode Plugin! It’s currently in Public Preview (PuPr) and you can download it from the Microsoft Visual Studio Extension marketplace. With the Snowflake Plugin, you will have access to some features such as:


  • Accounts and Sessions: the plugin allows you to connect to and easily switch between multiple Snowflake accounts. And (this is cool) you can share a single session between multiple open VSCode editor windows! Support for Single Sign On (SSO) is available.
  • Snowflake SQL Intellisense: autocomplete for object names, keywords, and built-in functions, with signature help for function calls. Links to documentation for keywords and built-in functions on hover.
  • Database Explorer: a treeview-based panel that lets you drill down into object definitions and details.
  • Query Execution: not just single statements, but multiple statement executions!
  • Query Results and History panel: View and sort query results and export results to CSV format. Review prior statement history and results, and copy/paste support on previous queries.


How to install the Snowflake plugin on VSCode:


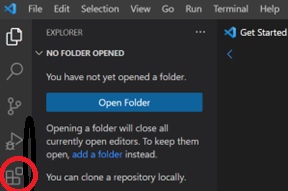
  1. Launch VSCode and head over to the Extensions Marketplace tab

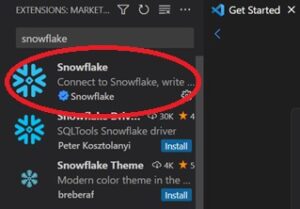
     2. Type in “Snowflake” and select the verified Snowflake extension (It should have the verification checkmark)

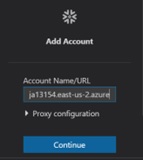
     3. Click on the Snowflake icon to log in. The extension will ask for your account’s URL however this part can be tricky. Instead of inputting the whole URL just add the part before .snowflakecomputing.com


For example, if your account URL is https://ja13154.east-us-2.azure.snowflakecomputing.com/, enter ja13154.east-us-2.azure in the Account Name/URL box.


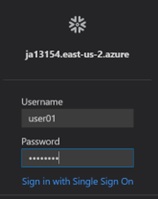
    4. As a final step add your username and password and you are all set to go!


With these simple steps, you can now use the Snowflake Plugin on VSCode. If you want to learn about other new features on Snowflake, be sure to check out our blog for new updates.

Snowflake Data Clean Rooms

Introduction: What is a Data Clean Room?


In this article, I will explain what a Snowflake Data Clean Room is on the Snowflake Data Cloud.
Data clean rooms on Snowflake are a set of data-related technologies that facilitate double-blind joins of data. These technologies include Data Shares, Row Access Policies, and Secure User Defined Functions. The underlying Data Sharing technology is based on Micro-Partitions, which provide features like Data Sharing and Data Cloning.

Although the original concept of data clean rooms was developed for data exchanges in advertising, I believe the concept can be applied to many other areas where “controlled” and “governed” double-blind joins of data sets can create significant value. This approach enables companies and their partners to share data at an aggregated double-blind join level, without sharing personally identifiable information (PII).
On Snowflake, sharing data through secure views and tables using their Data Share technology is already straightforward. You can share double-blind join previously agreed upon identifiers.


Part 1: Data Clean Room Example Use Cases

We helped Snowflake pioneer this new offering a couple of years ago with our client VideoAmp which we brought over to the Snowflake Data Cloud. Our original article back in July 2020 shows how to analyze PII and PHI Data using the earlier Data Clean Room concepts. Fast forward 2 years and now Snowflake has dramatically improved the initial version and scope that we put together. These are just a few examples; there are many other potential use cases for Snowflake Data Clean Rooms.


Media/Advertising:

  • Addressing the challenge of the “end of cookies” in a meaningful way, Snowflake’s Data Clean Rooms enable Advertisers to merge their first-party data and their publisher(s)’ viewership/exposure data, delivering more value for their marketing spend.
  • Collaborative Promotions. Conducting customer segment overlap analysis with a co-branding/co-marketing partner can reveal areas where customer segments and audiences are aligned.
  • Joint loyalty offerings and/or upsells can also be developed in partnership with aligned customer “interests”.


Healthcare and Life Sciences:

  • There are some extremely valuable use cases where we can securely share patient data and patient outcomes across government, healthcare, and life sciences to hopefully make some huge leaps forward in healthcare and life.


Financial Services:

  • Combining data from multiple financial institutions to identify fraud or money laundering activities without sharing sensitive customer information.


Retail:

  • Combining customer data from different sources to create targeted marketing campaigns and promotions.


Government:

  • Sharing data across different government agencies to improve public services while protecting individual privacy.


Part 2: Looking for more information about Data Clean Rooms?

Here are some additional resources to help you learn more about Data Clean rooms and Data Collaboration.


Lastly, here’s an interview I provided on my view of the opportunities around Data Clean Rooms on Snowflake. I shared some insights gained from decades of experience working in data, including thoughts about the transformational impact that cloud-based data sharing, data collaboration, data marketplaces, and data clean rooms are having on companies and industries.

What’s Next in Data Collaboration & Why Data Clean Rooms Are Exciting: Insights From Frank Bell


Are you interested in how you can use a Snowflake Data Clean Room for your business? Contact Us Today.

A Deep Dive into Data Sharing

Introduction:

Big data refers to extremely large datasets that can be analyzed to identify patterns, trends, and associations. The analysis of big data provides insights into various fields, including business, science, and government. However, the challenge with big data is not just analyzing it, but also storing, managing, and sharing it. This is where technologies like Snowflake come into play, as they offer a secure platform for storing and sharing large amounts of data.


Part 1: What is Data Sharing?

Let’s begin with data, data can derive from software that is used by enterprises within their business. For example, how many people are viewing a website, or what kind of people are most interested in a certain brand? On a lower level, data sharing is simply when data resources are shared with many users or applications and at the same time assuring that there is data fidelity to all of those participating.

Now how is this relevant today? Currently, data sources are continuous which in turn means that there have to be data volumes for all the data sources. The main focus, of data sharing, has become how to move these increasing volumes of data and how to ensure that the data is accurate and secure. The cloud comes into play as it is expanding what data sharing is capable of. Now that there is the modern cloud, data sharing can allow people to share live data within their business and outside of it, get rid of data silos, create access to specific data sets, and more. However, this would require a platform that can put data sharing into motion and ensure that it works to its potential and this is where Snowflake comes into the picture.


Snowflake and Data Sharing

Snowflake allows for data collaboration while at the same time lowering costs. It gives organizations the ability to securely share data and access live data. Not only is it secured and governed access to shared data but you can also publish data sets. As you can see the possibilities seem endless, but that’s only a brief preview of the capabilities of data sharing within Snowflake so let’s take a deeper look at the many parts that play a role in data sharing in Snowflake and how they come together in data sharing.


Part 2: What are Data Providers and Consumers?

A data provider is an account in Snowflake that creates shares that can be accessed by other accounts in Snowflake. When a database is shared, Snowflake supports it through grants that allow access control to objects within the database. There are no restrictions on the number of shares that can be created or accounts that can be added to a share.

A data consumer is an account that creates a database from a Share that is made accessible by another data provider. When you add a shared database to your account, you can access and query the objects within it. There are no limitations on how many Shares you can consume from data providers, but you can only create one database for each Share.


What is a Share?

In Snowflake, Shares are objects that contain all the necessary information for sharing a database. Shares include permissions that provide access to the databases and schema containing the object to be shared, as well as access to specific objects within the database. Additionally, consumer accounts are shared with the database and objects.

When a database is created from a Share, the objects shared within it become available to any users within the consumer account. These Shares can be customized, are secure, and are fully controlled by the provider account. This allows objects added to a Share to be accessed in real-time by consumers, and the provider account can also rescind access to a Share or any of its objects.


Part 3: How does Secure Data Sharing Function work in Snowflake?

When securely sharing data, the data is not copied or transferred between accounts, as one might assume. Rather, sharing is accomplished through Snowflake’s layer and metadata store. As a result, shared data does not occupy storage space within a consumer account, and therefore does not contribute to monthly data storage costs. However, charges will be incurred for the compute resources required to query the shared data.

Going back to what was previously mentioned, because the data itself is not copied or exchanged it makes secure data sharing an easy and fast setup for providers and it also makes shared data quickly available to consumers. But let’s take a closer look at how data sharing works for both the provider and the consumer:


Provider:

We will create a share of a database within your account. You can then grant access to objects within the database. This will enable you to share data from multiple databases, as long as those databases are under the same account. Finally, you can add one or more accounts to the share, including any accounts that you may have within Snowflake.


Consumer:

We will set up a read-only database from Share. You can customize access to the database by using the same access control that is provided for objects.

The structure of Snowflake allows providers to share data with many consumers, even those within their organization. Consumers can access shared data from many providers.


What Information is shared with Providers?

Snowflake providers have access to certain information about consumers who access their data. This includes the consumer’s Snowflake account and organization names. Providers can also view statistical data about data consumption, such as the date of consumption and the number of queries generated by the consumer account on a provider’s Share.

In addition, providers can see any information that a consumer provides at the time of data request submissions, such as the consumer’s business email and company name.


Can I share with Third Parties?

Sharing data is only possible between Snowflake accounts. However, if you’re a provider within Snowflake, you may want to share data with a consumer outside of Snowflake. Luckily, Snowflake has created reader accounts to facilitate this process.

Reader accounts enable data to be shared with consumers who are not Snowflake customers without the need for them to become one. These accounts are owned by the provider account that created them. While the provider account uses Shares to share databases with reader accounts, the reader account can only receive data from the provider account that created it.

Users with a reader account can query shared data, but they are unable to perform DML tasks that are available in a full account.

Having introduced data sharing and its workings within Snowflake, let’s explore other features that come with Snowflake’s data sharing.


Part 4: Products that use Secure Data Sharing in Snowflake

Snowflake offers additional products that enable data sharing between providers and consumers. These products include Direct Share, Snowflake Data Marketplace, and Data Exchange.


Direct Share:

Direct Share is a simple method of sharing data that enables account-to-account data sharing while utilizing Snowflake’s Secure Data Sharing. As the provider (account on Snowflake), you can grant access to your data to other companies, allowing them to view your data within their Snowflake account without the need to move or copy any data.


Snowflake Data Marketplace:

All accounts in Snowflake can access the Snowflake Data Marketplace, provided they are in non-VPS regions on supported cloud platforms. The Data Marketplace uses Snowflake’s Securing Data Sharing to facilitate connections between providers and consumers, similar to the Direct Share product.

You have the option to access third-party data and import the datasets into your Snowflake account without the need for transformation. This allows you to easily combine it with your existing data. The Data Marketplace provides a central location to obtain data from multiple sellers, simplifying the process of data sourcing.

Additionally, becoming a provider and publishing data within the Data Marketplace is a great way to monetize your data and reach a wider audience.


Data Exchange:

Data Exchange enables secure collaboration around data between invited groups, allowing providers to share data with consumers, as well as with your entire organization, including customers, partners, or even just within your unit. It also provides you with the ability to control who has access to your data, and who can publish, consume, or simply view it. Specifically, you can invite others and determine whether they are authorized to provide or consume data. Data Exchange is available for all Snowflake accounts hosted on non-VPS regions and supported cloud platforms.

These three products in Snowflake that use secure data sharing are useful for both provider and consumer accounts (and more) within Snowflake. Now that we have seen how data sharing works and what other features use data sharing in Snowflake, let’s take a look at how to use the data that was shared with you or your data that is shared with others and more.


Working with Shared Data:

Once you have a grasp of the fundamentals of direct share, Snowflake Marketplace, and data exchange, there are additional concepts and tools available for you to explore.

Within Snowflake, those with an ACCOUNTADMIN role can utilize the Shared Data page on the new web interface to manage and create shares. As we delve further, please note that “inbound” refers to data that has been shared with you, while “outbound” refers to data shared from your account.


Data Shared with You:

Provider accounts can share inbound shares with your account using Direct Share, Data Exchange, or the Snowflake Marketplace. Inbound shares allow you to view data shared by providers, including who provided the share and how the data was shared. You can also create a database from a share.

To access your inbound shares, go to the “Share With Me” tab within the Snowflake web interface. Here you will find:

  • Direct shares that are shared with you. These shares are placed into two groups: 1. Direct shares that are ready to be used and 2. Direct shares that have been imported into a database can be queried.
  • Listings for data exchange that you have access to. The data is shown under the name of the initial data exchange. If you have more than one data exchange, each data exchange will be shown within separate sections.
  • Listings for the Snowflake Marketplace data that have been moved into a database and can be queried. However, it does not show shares that are ready to be used. You can find the data listing in the Marketplace menu.


Data You Shared:

Your account allows you to share data with consumers through outbound shares. You can share data directly, through data exchange, or via the Snowflake Marketplace (as previously mentioned for inbound shares).

With outbound shares, you can:

  • View the shares you have created or have access to, including information such as the database for the share, consumer accounts that can access the share, the date when the share was created, and the objects that are being shared.
  • Create and edit both a share and its data listing.
  • Remove access to the share for individual consumer accounts.

Returning to the web interface, the “Shared by My Account” tab displays outbound shares from Snowflake Marketplace, data exchange, and direct shares.

When considering shares, icons are located beside each share to indicate the sharing mechanisms like direct sharing, data exchange, or Snowflake Marketplace.

Lastly, there are filters available when viewing your shared data:

  • Type: This is presented as the “Ally Types” drop-down and allows you to differentiate direct shares from listings.
  • Consumer: This is presented as the “Shared With” drop-down and allows you to select a specific consumer or data exchange (where the data has been shared).


Data that is Shared

When sharing data, there are many ways you can do this:

  1. Use direct share to directly share data with consumers
  2. In the Snowflake Marketplace, post a listing
  3. In data exchange, post a listing

Furthermore, when you are in the web interface and you want to share data, you will use the “Share Data” drop-down and choose from the list that provides all the platforms where you can share data.


Requesting Data

In the web interface, you can view inbound and outbound requests in the “Requests” tab. However, this tab does not display data requests from the Snowflake Data Marketplace.

Let’s take a moment to review what inbound and outbound requests mean.

Inbound requests are made by consumers who are seeking access to your data. You can organize these requests by status and review them accordingly. Outbound requests, on the other hand, are requests made by you to obtain data listings from other providers. Just like inbound requests, you can sort them by status. Keep in mind that the requests you make may be rejected, but you can always resubmit them.


Managing Exchanges

In certain roles, such as the Data Exchange Admin role or if you have Provider Profile Level Privileges, you can create and organize provider profiles within the “Manage Exchanges” tab. However, if your organization does not have a data exchange, the “Manage Exchanges” tab will not be visible.

Regarding the provider profile, with this role, you can perform the following tasks within a data exchange:

  • Create, update, and delete a profile
  • Update contact email
  • Manage profile editors

Now that we have reviewed data sharing, you should be able to understand all its components and the different functions it offers!

To keep up with new features, regularly visit our website for more information and tips.


Conclusion:

This article provides a deep dive into data sharing and how it works within the Snowflake ecosystem. It covers the basics of data sharing, the role of data providers and consumers, and how to secure data-sharing functions. Additionally, it explores Snowflake’s products that use secure data sharing, such as Direct Share, Snowflake Data Marketplace, and Data Exchange. The article also explains how to work with shared data, including managing inbound and outbound requests and managing exchanges.

Exploring Snowflake’s Search Optimization Service

Introduction:


In today’s article, we’ll explore together Snowflake’s Search Optimization Service, a feature that can improve the performance of point lookup for certain queries by creating search access paths. The service is available on the Enterprise Edition or higher for Snowflake and is best for business users who rely on quick access to data for critical business decisions.

The article also covers how to turn on the service, its benefits, and its cost. We also introduce Snoptimizer™, our service that scans for all the Snowflake anti-patterns and optimizes your account to help you run cost-effectively.


History of Snowflake & Search Optimization:


Snowflake initially made a name for itself as the easiest data warehouse to use back in 2014. Since then it has transformed itself and its core technology into a full Snowflake Data Cloud. While the Snowflake Data Cloud Account at first comes with many amazing features by default, there are many areas where you can optimize Snowflake for your specific needs and use cases. As Snowflake has grown over the years, it has added a ton of functionality including paid services such as SnowPipe, Materialized Views, Auto Clustering, Search Optimization Service, and others.

Alternatively, it can be useful for data scientists who want to continuously explore specific subsets of data. Essentially it is a maintenance service that runs in the background of Snowflake and creates search access paths. These paths make it easier to load and populate data quickly, as well as update stale data.


Turning on the Feature:


To turn on such a feature, you must first ensure you are using an account that has access to add it to a table. Having access means you have the following privileges: ownership & add search optimization. Once that requirement is met, it’s as simple as typing the following into your console:


ALTER TABLE [IF EXISTS] <table_name> ADD SEARCH OPTIMIZATION;

To ensure it is turned on, show your tables and check to see that ‘Search Optimization’ says ON. A few notes to add is that you will see an increase in credit consumption while the service runs and starts to build the search access paths. You can get an estimate of the cost for specific tables before committing by running the following command:


SYSTEM$ESTIMATE_SEARCH_OPTIMIZATION_COSTS(‘<table_name>’)

Being strategic with the tables you introduce to the search optimization service will help greatly with reducing those costs. The service fits best for tables that aren’t queried by columns and tables that aren’t clustered.

If you add the service and decide to move it later on, you can easily do so with the correct privileges by running the following command:


ALTER TABLE [IF EXISTS] <table_name> DROP SEARCH OPTIMIZATION;

This is just one solution to make your life easier and queries faster, however, there are many more out there that are more cost-friendly and do not require you to look thoroughly through your tables. One of the prime examples is Snoptimizer™, our service that scans for all the Snowflake anti-patterns and optimizes your account to help you run cost-effectively. It checks your resource monitors, auto-suspend settings, cloud service consumption, and warehouse computing among other things to fix your account and ensure you are fully optimized.


Conclusion:


Snowflake’s Search Optimization Service is a powerful feature that can significantly improve the speed and efficiency of certain queries. While it comes with a cost, it can be a valuable investment for business users who rely on quick access to data for critical decision-making. However, it’s important to be strategic about which tables you introduce to the service to minimize costs. Additionally, there are alternative solutions available, such as Snoptimizer™, that can optimize your account and help you run cost-effectively. With the right approach, Snowflake’s Search Optimization Service can be a powerful tool in your data optimization arsenal.

Too Busy for Snowflake’s Summit? We Feel You.

Introduction:


This Snowflake’s Summit was a roller coaster of emotions, but more often than not, we were thrilled with all the new announcements. With over 61+ sessions, we got to see some of Snowflake’s amazing new features, tons of use cases, and first-hand looks at how to use their new tools with step-by-step labs. Most of us are too busy to watch two days’ worth of webinars, but that’s where we come in – providing you with your weekly dose of Snowflake Solutions! We decided to help out by highlighting the most important announcements, as well as the sessions we thought were worth the watch!

This time around Snowflake announced that they have five main areas of innovation: data programmability, global data governance, platform optimization, connected industries, and powered by Snowflake. While magical upgrades and new tools mean more flexibility for users, the reality is that most of these new features are still in private preview, so we, the public, won’t see them in action for some time. Regardless, we’ll still go through the top areas of innovation:


Platform optimization:

One of the most significant improvements this year is the enhanced storage economics, resulting in reduced storage costs due to improved data compression. As a result, many will begin to see savings on storage for new data. Additionally, Snowflake has developed new usage dashboards, enabling users to better monitor and comprehend their usage and costs across the platform. While it appears that Snowflake is making progress in the direction of cost optimization, the subject has been challenging so far, and there are not enough safeguards in place to prevent warehouse sizes (and bills) from skyrocketing. If you’re interested in discovering the various ways your company can inadvertently lose money on Snowflake, as well as strategies for avoiding them, we invite you to register for our upcoming Cost Optimization webinar.


Global Data Governance:

Moving forward, we will discuss the six new data governance capabilities that have been added to the Snowflake platform. We will focus on the three that are most exciting.


1. Classification:

Automatically detects personally identifiable information.

  • Why is this cool? We can apply specific security controls to protect their data!


2. Row access policies:

Dynamically restrict the rows of data in the query based on the username, role, or other custom attributes.

  • Why is this cool? We no longer need multiple secure views and can eliminate the need for maintaining data silos. That’s a win in our book.


3. Access History:

A new view that shows used and unused tables to produce reports.

  • Why is this cool? You can see what’s bringing value and optimize storage costs based on what is frequently accessed or completely abandoned data. Who doesn’t love to save money?


Connected Industries:

Following we have two upcoming features that we thought were worth mentioning since they will be game-changers! These two features are Discover & Transact and Try Before You Buy, both of which will ease collaboration and data procurement between connected industries.


1. Discover and Transact:

Directly within the Snowflake Data Marketplace, a consumer can now discover data and purchase with a usage-based pricing model.

  • This is truly cool because of the self-service aspect! By providing this feature, we can significantly reduce the cost of selling and delivering data to our valuable clients.


2. Try Before You Buy:

Now consumers can access sample data to make sure they’re getting all they need before signing that check.

  • Why is this interesting? Everyone loves a free sample!


Data Programmability:


Probably the most important updates are under the data programmability umbrella. So, if you’re still with me, hang on a little longer, this is about to get interesting!

Some innovations are ready to be used now in public preview, so let’s check them out:

  1. SQL API: This new API enables customers to automate administrative tasks without having to manage infrastructure, there’s no need to maintain an external API management hub!
  2. Schema Detection: Now supports Parquet, Orc, Arvo, and hopefully more file formats in the future.


Exciting things to look forward to soon:

  1. Serverless Tasks: Snowflake will determine and schedule the right amount of computer resources needed for your tasks.
  2. Snowpark and Java UDFs: Snowpark is going to be the Snowflake developer’s new playground. It allows developers to bring their preferred languages directly into the platform. Java UDFS will also enable data engineers and developers to bring their custom code to Snowflake. This enables better performance on both sides!
  3. Unstructured Data Support: Soon, we will be able to treat unstructured data the same as structured data, with the ability to store, govern, process, and share.
  4. Machine Learning with Amazon SageMaker: A tool that will automatically build and insert the best machine-learning models into Snowflake!


Conclusion:


In summary, Snowflake’s 2022 Summit exhibited several noteworthy novel features and updates, particularly in the domains of platform optimization, global data governance, and data programmability. Although a significant number of these features are still in private preview, they provide a glimpse into Snowflake’s future direction and potential.

Keep an eye out for more updates and guidance from IT Strategists on how to leverage Snowflake’s tools and solutions to their fullest potential. Be sure to check out our blog for more news and information.

Snowflake Data Masking

Introduction:


Today’s article discusses Snowflake Data Cloud’s implementation of dynamic data masking, which is a column-level security feature used to mask data at query runtime. We provide a step-by-step guide on how to create and apply a data masking policy for email addresses in a stored procedure. The article also highlights the benefits of using dynamic data masking policies to secure and obfuscate PII data for different roles without access while displaying the data to roles that need access to it.

Last week, the United States Centers for Disease Control and Prevention (CDC) issued new policies regarding COVID-19 masks. We will focus on how to implement Snowflake Data Cloud’s “Data Masking”. Let’s get started!


What is Data Masking?


Data Masking is just like it sounds… the hiding or masking of data. This is a practical method to add extra data masking for column-level security. Data Masking overall is a simple concept. It has caught on in our new age of GDPR, PII. What is Snowflake’s Version of Data Masking? Snowflake’s implementation of this is… Dynamic Data Masking.

Dynamic Data Masking is column-level security that uses masking policies to mask data at your query run time. Snowflake’s version of data masking, has several features including Masking policies that are at the schema level. Data Masking currently works to mask data at either the table or view object. The masking policies are applied at query runtime. The masking policies are applied to every location where the column is displayed. Depending on all the variables of your role, your role hierarchy, your masking policy conditions, and SQL execution content then you will see fully masked data, partially masked data, or just plain text!

Now that you know what Snowflake Data Cloud Dynamic Data Masking is then…. how do you use it? Data Masking within Snowflake is enabled with Data Definition Language (DDL). Here is the basic syntax constructs you use for the masking policy object. It is your typical object CREATE, ALTER, DROP, SHOW, DESCRIBE. This is a common feature for most Snowflake objects, and one of the reasons why I prefer Snowflake. Most of the time, it’s reliable, easy to use, and consistent.

So, let’s have some fun and create a data masking policy for email addresses in a simple example. There are 3 main parts for creating and applying a dynamic data mask on Snowflake to a column. Here we go:


PART 1 – Enable and Grant Masking Policy


To enable masking policy on Snowflake, follow these steps:

  1. Grant create masking policy on schema to a role. For example: GRANT CREATE MASKING POLICY ON SCHEMA DEMO_MASKING_DB.DEMO TO ROLE "DATA_MASKING_ADMIN_ROLE";
  2. Use the account admin role to grant apply masking policy on account to the role. For example: GRANT APPLY MASKING POLICY ON ACCOUNT TO ROLE "DATA_MASKING_ADMIN_ROLE";

Replace “DEMO_MASKING_DB.DEMO” with the actual schema name and “DATA_MASKING_ADMIN_ROLE” with the actual role name.

Remember to grant the necessary privileges to the roles that will use the masking policy.


PART 2 – Create a Masking Policy

To create a masking policy in Snowflake, follow these steps:

  1. Use a role that has the necessary privileges to create a masking policy.
  2. Use the schema where the table or view that needs the masking policy is located.
  3. Use the CREATE MASKING POLICY statement to create the policy. For example:
CREATE OR REPLACE MASKING POLICY MASK_FOR_EMAIL AS (VAL STRING) RETURNS STRING ->
CASE
WHEN CURRENT_ROLE() IN ('HR_ROLE') THEN VAL
ELSE '*********'
END;

Replace MASK_FOR_EMAIL with the name of your masking policy. In this example, the policy masks the email column with asterisks for all roles except for the HR_ROLE.

Remember to grant the necessary privileges to the roles that will use the masking policy.


PART 3 – Apply the Masking Policy to a Column in a View or Table


To apply the masking policy to a column in a view or table in Snowflake:

  1. Use a role that has the necessary privileges to modify the table or view.
  2. Use the schema where the table or view that needs the masking policy is located.
  3. Use the ALTER TABLE or ALTER VIEW statement to modify the column and apply the masking policy. For example:
ALTER TABLE IF EXISTS EMPLOYEE MODIFY COLUMN EMAIL SET MASKING POLICY MASK_FOR_EMAIL;

Replace EMPLOYEE with the name of your table and EMAIL with the name of the column that needs the masking policy. Replace MASK_FOR_EMAIL with the name of your masking policy.

Remember to grant the necessary privileges to the roles that will use the masking policy.

(just creating a masking policy is not enough. Kind of like wearing a covid mask under your mouth and nose.  Even though you have a mask, it’s not applied really so it’s not working)


We will show you how to do all of this in detail below.


Dynamic Data Masking Example

Let’s say we want to create a data mask for email addresses in our row using a stored procedure.

If you have not been using our Snowflake Solutions Demo Database Training Example then let’s create a database, schema, and table to use.


/* SETUP DEMO DATABASE AND TABLE FOR DATA MASKING DEMO and PROOF OF CONCEPT */
USE ROLE SYSADMIN;  /*use this role or equivalent */
CREATE OR REPLACE DATABASE DEMO_MASKING_DB;
CREATE SCHEMA DEMO;
CREATE OR REPLACE TABLE EMPLOYEE(ID INT, FULLNAME VARCHAR,HOME_ADDRESS VARCHAR,EMAIL VARCHAR);
INSERT INTO EMPLOYEE VALUES(1,'Frank Bell','1000 Snowflake Lane North Pole, Alaska', 'fbell@snowflake.com');
INSERT INTO EMPLOYEE VALUES(2,'Frank S','1000 Snowflake Lane North Pole, Alaska', 'franks@snowflake.com');
INSERT INTO EMPLOYEE VALUES(3,'Craig Stevens','1000 Snowflake Lane North Pole, Alaska', 'craig@snowflake.com');
CREATE WAREHOUSE IF NOT EXISTS MASK_WH WITH WAREHOUSE_SIZE = XSMALL, INITIALLY_SUSPENDED = TRUE, auto_suspend = 60;


/* PART 0 – create and grant roles for DATA MASKING DEMO – REPLACE FREDDY WITH YOUR USERNAME– there is more to do when you use custom roles with no privileges */USE ROLE SECURITYADMIN;CREATE ROLE IF NOT EXISTS EMPLOYEE_ROLE;CREATE ROLE IF NOT EXISTS MANAGER_ROLE;CREATE ROLE IF NOT EXISTS HR_ROLE;CREATE ROLE IF NOT EXISTS DATA_MASKING_ADMIN_ROLE;GRANT USAGE ON DATABASE DEMO_MASKING_DB TO ROLE EMPLOYEE_ROLE;GRANT USAGE ON SCHEMA DEMO_MASKING_DB.DEMO TO ROLE EMPLOYEE_ROLE;GRANT SELECT ON TABLE DEMO_MASKING_DB.DEMO.EMPLOYEE TO ROLE EMPLOYEE_ROLE;GRANT USAGE ON DATABASE DEMO_MASKING_DB TO ROLE HR_ROLE;GRANT USAGE ON SCHEMA DEMO_MASKING_DB.DEMO TO ROLE HR_ROLE;GRANT SELECT ON TABLE DEMO_MASKING_DB.DEMO.EMPLOYEE TO ROLE HR_ROLE;GRANT USAGE,MODIFY ON DATABASE DEMO_MASKING_DB TO ROLE “DATA_MASKING_ADMIN_ROLE”;GRANT USAGE,MODIFY ON SCHEMA DEMO_MASKING_DB.DEMO TO ROLE “DATA_MASKING_ADMIN_ROLE”;GRANT USAGE ON WAREHOUSE MASK_WH TO ROLE EMPLOYEE_ROLE;GRANT USAGE ON WAREHOUSE MASK_WH TO ROLE HR_ROLE;GRANT ROLE EMPLOYEE_ROLE TO USER FREDDY;GRANT ROLE MANAGER_ROLE TO USER FREDDY;GRANT ROLE HR_ROLE TO USER FREDDY;GRANT ROLE DATA_MASKING_ADMIN_ROLE TO USER FREDDY;


/* PART 1 – enable masking policy ON ACCOUNT AND GRANT ACCESS TO ROLE */GRANT CREATE MASKING POLICY ON SCHEMA DEMO_MASKING_DB.DEMO TO ROLE “DATA_MASKING_ADMIN_ROLE”;USE ROLE ACCOUNTADMIN;GRANT APPLY MASKING POLICY ON ACCOUNT TO ROLE “DATA_MASKING_ADMIN_ROLE”;


/* PART 2 – CREATE MASKING POLICY /USE ROLE DATA_MASKING_ADMIN_ROLE; USE SCHEMA DEMO_MASKING_DB.DEMO;CREATE OR REPLACE MASKING POLICY MASK_FOR_EMAIL AS (VAL STRING) RETURNS STRING ->CASEWHEN CURRENT_ROLE() IN (‘HR_ROLE’) THEN VALELSE ‘********’END;


/* PART 3 - APPLY MASKING POLICY TO EMAIL COLUMN IN EMP:LOYEE TABLE */ALTER TABLE IF EXISTS EMPLOYEE MODIFY COLUMN EMAIL SET MASKING POLICY MASK_FOR_EMAIL;


**AWESOME – NOW YOU NOW HAVE CREATED AND APPLIED YOUR DATA MASK! Let’s Test it out.


/* TEST YOUR DATA MASK !!! --> TEST by QUERYING TABLE WITH DIFFERENT ROLES AND SEE RESULTS */
/* Notice the EMAIL is MASKED with ******* */
USE ROLE EMPLOYEE_ROLE;
SELECT * FROM DEMO_MASKING_DB.DEMO.EMPLOYEE;
/* Notice the EMAIL is NOT MASKED */
USE ROLE HR_ROLE;
SELECT * FROM DEMO_MASKING_DB.DEMO.EMPLOYEE;

ADDITIONAL DETAILS:

  • **MASKS are really custom data definition language (DDL) objects in Snowflake. *YOU can always get their DDL by using the Snowflake standard GET_DDL function or using DESCRIBE./ EXAMPLES for reviewing the MASKING POLICY // when using SECURITYADMIN or other roles without USAGE you must use the full DATABASE.SCHEMA.POLICY PATH */

USE ROLE SECURITYADMIN;DESCRIBE MASKING POLICY DEMO_MASKING_DB.DEMO.MASK_FOR_EMAIL;

USE ROLE ACCOUNTADMIN; /* when using SELECT that means the ROLE MUST HAVE USAGE enabled which the SECURITYADMIN role does not have by default */

SELECT GET_DDL(‘POLICY’,’DEMO_MASKING_DB.DEMO.MASK_FOR_EMAIL’);


Conclusion:


Dynamic Data Masking Policies are a great way to secure and obfuscate your PII data to different roles without access where necessary while at the same time displaying the PII data to the roles that need access to it. We hope this tutorial has helped you understand Dynamic Data Masking on Snowflake. For further information on Snowflake, check out our blog for more tips and tricks.

New Data Shares Added in January 2021 on the Snowflake Data Marketplace

Data Shares Removed from the Snowflake Data Marketplace

New Data Shares Available in November 2020 on the Snowflake Data Marketplace

New Data Shares Available in January 2021 on the Snowflake Data Marketplace

New Data Shares Available in December 2020 on the Snowflake Data Marketplace

Snowflake Data Marketplace Introduction

Introduction:


The Snowflake Data Marketplace is a cloud data exchange platform where organizations can discover, access, and share live, ready-to-query data sets in a secure, governed, and compliant manner.

Long gone are the days when consumers have to copy data, use APIs, or wait days, weeks, and sometimes even months to gain access to datasets. With Snowflake Data Marketplace, analysts around the world are getting the information they need to make important decisions for their businesses in a blink of an eye and the palm of their hands.


What is it and how does it work?


The Snowflake Data Marketplace provides access to live, query-ready data sets. It uses Snowflake’s Secure Data Sharing to connect data providers and consumers. Currently, it offers access to 229 data sets. As a consumer, you can discover and access various third-party data sets. They will be directly available in your Snowflake account to query. There’s no need to transform the data or spend time joining it with your own data. If you use multiple vendors for data, the Data Marketplace gives you a single source to access everything.


Why is this Marketplace important?


Companies can now securely and instantly share and access live, regulated data in real-time without copying or moving it. In the past, getting access to such data could take days, weeks, months, or even years. With the Data Marketplace, gaining access only takes a couple of minutes. Already over 2000 businesses have requested free access to key data sets in our marketplace. This is a gold mine for anyone who wants data-driven, on-demand access to live and ready-to-query data, and the best part is that it’s available globally, across clouds.

There are significant benefits for both providers and consumers. However, three key points enable companies to unlock their true potential using the Data Marketplace:


Source Data Faster and More Easily

  • As we said previously, using Snowflake Data Marketplace as a consumer allows users to avoid the risk and hassle of having to copy and migrate stale data. Instead, securely access live and governed shared data sets, and receive automatic updates in real-time.

Monetize Your Data

  • As a data provider on Snowflake’s Data Marketplace, you can create new revenue streams by offering your governed data assets to thousands of potential Snowflake data consumers.


Reduce Analytics Costs

  • Using this service eliminates the costs and effort of traditional data integration. Both consumers and providers can access shared data directly, securely, and compliantly from your Snowflake account. This streamlines data ingestion, pipelines, and transformation.


Learn more about Snowflake Data Marketplace


For more information on Snowflake’s Data Marketplace, visit the official website here.

If you’re curious to see Snowflake’s official Marketplace demo, check it out here.


Action Items after reading this article:


  • Visit the Snowflake Data Marketplace official website.
  • Check out Snowflake’s official Marketplace demo.
  • Learn more about accessing live, query-ready data sets through Snowflake’s Data Marketplace.
  • Find, try out, and purchase the data and applications you require to power innovative business solutions.
  • Discover how data providers can create new revenue streams by offering governed data assets.
  • Understand how the Data Marketplace reduces analytics costs by streamlining data ingestion, pipelines, and transformation.

Creating Your First Database

What’s the benefit of learning to create a database on Snowflake?


It is important to learn to create databases with Snowflake because:

  • Snowflake is a popular data warehouse built for the cloud. Having experience with Snowflake will be valuable for data engineers and data scientists.
  • Snowflake has many advantages over traditional data warehouses like fast performance, scalability, and low cost. Being able to build databases on Snowflake will allow you to leverage these benefits.
  • Snowflake uses SQL, a common query language, so the skills you learn will be transferable to other systems.
  • Snowflake has many features for modeling and managing data that you can utilize by knowing how to create databases and schemas.
  • There are many resources and a large community to help you learn Snowflake.


Creating Databases with the User Interface:


To complete this tutorial, you will need a Snowflake account and the URL to log in to the web interface.

Log in to your Snowflake environment and select the Databases tab at the top left of the screen. It should look similar to the image below, except you won’t have the same databases. Snowflake provides sample data.


https://snowflakesolutions.net/wp-content/uploads/word-image-23.png


Let’s create a new database. Click the Create button and fill out the information in the pop-up window.


https://snowflakesolutions.net/wp-content/uploads/word-image-24.png


When naming the database, there are restrictions — no spaces and the name cannot start with a number. You can read the full set of restrictions in Snowflake’s documentation.

Select Finish and you’ll see your new database appear in the table. Click on your database and you’ll see any tables, views, or schemas that exist. Since the database has just been created, none of these objects exists yet.


https://snowflakesolutions.net/wp-content/uploads/word-image-15.jpeg

Creating Schemas:


A snowflake schema is a logical grouping of database objects (tables, views, etc.). Each schema belongs to a single database and can have its security configuration.

From inside our selected database, select the Schemas tab. Snowflake will create a public and information schema by default. The PUBLIC schema can be used to create any other objects. The INFORMATION_SCHEMA contains all the metadata for the database.


https://snowflakesolutions.net/wp-content/uploads/word-image-16.jpeg


Click the Create button and provide and name and comment. The Managed Access option determines if the security of the objects within the schema is managed by the schema owner or the owner of the object.


https://snowflakesolutions.net/wp-content/uploads/word-image-17.jpeg

Creating Databases and Schemas with Code:


All operations done with the UI can also be done with SQL code on the tab of the worksheet. To see what code corresponds to the operations we are doing, click on the Show SQL button.


https://snowflakesolutions.net/wp-content/uploads/word-image-18.jpeg


Using code streamlines our Snowflake work once we understand how it functions. This can reduce time and automate tasks.

To run any SQL code in Snowflake, choose Worksheets from the main menu. This lists all databases on the left for reference and provides a space to enter your code. On the right, we see our current role, database, warehouse, and schema.

Let’s enter the code to replicate the UI process from before. When you click Run, only the line where your cursor is executes. To run multiple lines, highlight them and click Run. If you’ve already created your database, run DROP DATABASE DEMO_DB for this to work.


https://snowflakesolutions.net/wp-content/uploads/word-image-25.png


And with those steps, you should be able to create a database. If you want to learn new techniques, keep checking our blog regularly for more helpful tips.


Conclusion:


To conclude, we have walked through the steps to create your first database and schema in Snowflake using both the user interface and SQL code. You now have the foundation to build tables, load data, and query your Snowflake data warehouse.

Semi Structured JSON Data

Introduction:


In today’s article we’ll go over Snowflake’s support for semi-structured data in the form of JSON, Avro, ORC, Parquet, and XML. It covers the process of loading JSON data into a Snowflake table, including creating a database object, schema, table, file format, and stage. It also provides an example of querying semi-structured data using Snowflake’s SQL SELECT statements.


What is Snowflake’s semi-structured data?


One of Snowflake’s unique feature is its native support for semi-structured data. Snowflake supports semi-structured data in the form of JSON, Avro, ORC, Parquet, and XML. Semi-structured data is data that does not conform to a specific schema, such as JSON data. Snowflake can load JSON data directly into table columns with type VARIANT, a universal type that can be used to store values of any type. Data can be queried using SQL SELECT statements that reference JSON elements by their paths.

One of Snowflake’s unique features is its native support for semi-structured data. Snowflake supports semi-structured data in the form of JSON, Avro, ORC, Parquet, and XML. JSON is the most widely used and industry standard due to its data format and ease of use.


JSON data can be loaded directly into the table columns with type VARIANT, a universal type that can be used to store values of any type. Data can be queried using SQL SELECT statements that reference JSON elements by their paths.

Let’s take a look at our JSON data. Here our some JSON data properties:

  • Data in JSON is a name-value pair.
  • Data is separated by a comma.
  • Curly braces hold objects.
  • Square brackets hold an array.
{
"ID": 1,
"color": "black",
"category": "hue",
"type": "primary",
"code": {
"rgb": "255,255,255",
"hex": "#000"
}
},{
"ID": 2,
"color": "white",
"category": "value",
"code": {
"rgb": "0,0,0",
"hex": "#FFF"
}
},{
"ID": 3,
"color": "red",
"category": "hue",
"type": "primary",
"code": {
"rgb": "255,0,0",
"hex": "#FF0"
}
}

Database Object

We have created a new database object to load and process semi-structured data as shown below. You can use the existing one if you have already created it earlier.

CREATE DATABASE IF NOT EXISTS TEST_DATABASE;


Schema

Create a new schema under TEST_DATABASE object to have ease of access. This step is optional if you already have access to the existing schema. In such a case you can use the existing schema.

CREATE DATABASE IF NOT EXISTS TEST_DATABASE;

Table

In order to create JSON data, we need an object to hold the data and it should be capable enough to hold the semi-structured data.

In snowflake, to process the semi-structured data, we have the following data types:

  • Variant
  • Array
  • Object

We’ll be using the variant object to load data into a Snowflake table.

CREATE TABLE IF NOT EXISTS COLORS
(
TEST_DATA VARIANT
);

Object CHRISTMAS_REC is created with one column TEST_DATA that holds the object of JSON data.


File Format

To load the JSON object into a Snowflake table, file format is one of the mandatory objects in snowflake:

CREATE FILE FORMAT JSON_FILE_FORMAT
TYPE = 'JSON'
COMPRESSION = 'AUTO'
ENABLE_OCTAL = FALSE
ALLOW_DUPLICATE = FALSE
STRIP_OUTER_ARRAY = TRUE
STRIP_NULL_VALUES = FALSE   IGNORE_UTF8_ERRORS = FALSE;

The above file format is specific to JSON. The STRIP_OUTER_ARRAY array option removes the outer set of square brackets [ ] when loading the data, separating the initial array into multiple lines. If we did not strip the outer array, our entire dataset would be loaded into a single row in the destination table.


Stage

In order to copy the data to a Snowflake table, we need data files in the cloud environment. Snowflake provides two types of stages:

  • Snowflake Internal stage.
  • External stages (AWS, Azure, GCP).

If you do not have any cloud platform, Snowflake provides space to store data into its cloud environment called – “Snowflake Internal stage”.

In this article, we have used a Snowflake internal stage and created a dedicated stage for semi-structured load.

CREATE STAGE IF NOT EXISTS JSON_STAGE FILE_FORMAT = JSON_FILE_FORMAT;

You can use below command to list files in stages:

LIST @JSON_STAGE;

PUT & COPY Command


PUT command fetches data from local storage to snowflake internal stages. You can run this command from the Snowflake CLI client. I’ll be using the Snowflake UI to do it under the database tab.

PUT file://<file_path>/sample.json @COLORS/ui1591821970011   COPY INTO "TEST_DATABASE"."TEST_SCHEMA"."COLORS" FROM @/ui1591821970011 FILE_FORMAT = '"TEST_DATABASE"."TEST_SCHEMA"."JSON_FILE_FORMAT"' ON_ERROR = 'ABORT_STATEMENT';

You can accomplish the same thing by using Snowflake UI under the database tab. Click on your database and then find your way to the table. Click on load data above it.


https://snowflakesolutions.net/wp-content/uploads/word-image-18.png


Check that the data was properly loaded (SELECT from COLORS).

https://snowflakesolutions.net/wp-content/uploads/word-image-19.png


Querying Semi-Structured Data

Snowflake is extremely powerful when it comes to querying semi-structured data. The command works a lot like JavaScript, except we use : notation to retrieve the category for each row. By using :: notation, we define the end data type of the values being retrieved.

SELECT
test_data:ID::INTEGER as ID,
test_data:color::STRING as color,
test_data:category::STRING as category,
test_data:type::STRING as type,
test_data:code.rgb::STRING as code_rgb,
test_data:code.hex::STRING as code_hex
FROM
colors;

https://snowflakesolutions.net/wp-content/uploads/word-image-20.png


Conclusion:


The process of loading data into a database can be a cumbersome task but with Snowflake, this can be done easily. Snowflake functionality makes it possible to process semi-structured data. Check out the docs to learn more about semi-structured data.

Snowflake Stored Procedures

Part 1 – Introduction


Today’s article provides an introduction to stored procedures in Snowflake, which can be used to create modular code with complex business logic by combining SQL statements with procedural logic. The article discusses the benefits of stored procedures, including error handling and dynamically creating SQL statements, and provides examples of how to create and use stored procedures in Snowflake.


Part 2 – What are Snowflake Stored Procedures?


Snowflake stored procedures can be thought of as a function that enables users to create modular code with complex business logic by combining multiple SQL statements with procedural logic. They are used for data migration and validation while handling exceptions. Benefits of stored procedures include procedural logic such as branching and looping, error handling, dynamically creating SQL statements to execute, and executing code with the privileges of the stored procedure creator. A Stored Procedure is created with a CREATE PROCEDURE command and is executed with a CALL command. A Stored Procedure uses JavaScript for logic and control and SQL is used to call the JavaScript API.


Part 3 – Benefits of Stored Procedures include:


  • Procedural logic such as branching and looping which straight SQL does not support.
  • Error handling.
  • Dynamically creating SQL statements to execute.
  • Executing code with the privileges of the stored procedures creator. This allows stored procedure owners to delegate power to perform operations to users who otherwise could not.

A Stored Procedure is created with a CREATE PROCEDURE command and is executed with a CALL command. The result is returned as a single value. A Stored Procedure uses JavaScript for logic and control and SQL is used to call the JavaScript API.


Part 4 – Stored Procedure Examples:


Let’s say we want to insert a row using a stored procedure.

First, let’s create a database and table to use.

USE DATABASE DEMO_DB;
CREATE OR REPLACE TABLE Employee(emp_id INT, emp_name varchar,emp_address varchar);
create sequence if not exists emp_id;

Now that we have that setup, let’s create our first stored procedure.

CREATE OR REPLACE PROCEDURE employee_insert(name varchar, address varchar)
RETURNS VARCHAR
LANGUAGE JAVASCRIPT
AS
$$
var command = "INSERT INTO Employee (emp_id, emp_name, emp_address) VALUES (emp_id.nextval, '"+NAME+"','"+ADDRESS+"')";
var cmd_dict = {sqlText: command};
var stmt = snowflake.createStatement(cmd_dict);
var rs = stmt.execute();
return 'success';
$$;

In the first section, we define the SPs name, parameters, return value, and language. Then between the $$, we write the actual code. Now that everything is setup, we can use the SP with the CALL command like this:

CALL employee_insert('Name','Location');

Let’s give this a try and see what happens!

https://snowflakesolutions.net/wp-content/uploads/word-image-17.png


Awesome! That worked!

Make sure to use a database that exists in your console if you’re replicating this.

However, a simple insert isn’t particularly useful for a Stored Procedure. We’d be better off just using pure SQL. Let’s look at a more realistic example that better demonstrates the power of Stored Procedures.


Taking it Further


Let’s imagine the following scenario. You receive an employee’s data in JSON. You want to store it on the table but you have to ensure the following first:

  • Employee name cannot be empty or NULL
  • Employee name must be unique
  • Employee address cannot be NULL

It is possible to do all of this using a single stored procedure. However, since we have two distinct tasks — validation and insert — it’s better practice to break them up into 2 separate procedures. We’ll then call the validation procedure from inside the insert procedure. We’ll be utilizing Snowflake’s variant type to return a json object. Let’s take a look at our validate procedure.


Validate Procedure


create or replace procedure employee_validate_json(INPUT VARCHAR)
RETURNS VARIANT NOT NULL
LANGUAGE JAVASCRIPT
AS
$$
var json_row = {};
var error_count = 0;
try {
    var employee_data = JSON.parse(INPUT);
    var employee_id = employee_data.employee_id;
    var employee_name = employee_data.employee_name;
    var employee_address = employee_data.employee_address;
    if (!employee_name) {
        json_row["employee_name"] = "employee name cannot be empty or null.";
        error_count = 1;
    } else {
        var command = "select count(*) from Employee where emp_name='"+ employee_name + "'";
        var stmt = snowflake.createStatement({sqlText: command});
        var res = stmt.execute();
        res.next();
        row_count = res.getColumnValue(1);
// check for duplicate
    if (row_count > 0) {
        json_row["employee_name"] = "employee name already exists in table.";
        error_count = 1;
    }
}
if (employee_address == null || employee_address == undefined) {
    json_row["employee_address"] = "employee address should not be NULL.";
    error_count = 1;
}
json_row["is_error"] = error_count;
} catch (err) {
    json_row["Exception"] = "Exception: " + err;
    json_row["is_error"] = 1;
}
return json_row;
$$;

The stored procedure will either return is_error = 0 if there is nothing wrong with our JSON or return is_error = 1 with the appropriate error message.

Successful run:

call EMPLOYEE_VALIDATE_JSON('{
"employee_name": "Lucas", "employee_address": "Los Angeles"
}');

Result:
{ "is_error": 0 }

Error run:

call EMPLOYEE_VALIDATE_JSON('{
"employee_name": "", "employee_address": "Los Angeles"
}');

Result:
{"employee_name": "employee name cannot be empty or null.", "is_error": 1 }

Now that we have our validation working. Let’s dive into our insert procedure!


Insert Procedure


Our insert procedure is going to call our validate procedure and check for any errors. If it finds any, it will return them. If not, it will attempt to insert the data into the table. Also returning a json upon completion.

create or replace procedure employee_insert_json(INPUT VARCHAR)
RETURNS VARIANT NOT NULL
LANGUAGE JAVASCRIPT
AS
$$
var json_row = {};
var message = {};
var detail = {};
var result = '';
var error_count = 0;
try {
    var employee_data = JSON.parse(INPUT);
    var employee_name = employee_data.employee_name;
    var employee_address = employee_data.employee_address;
    var command_validate = "call employee_validate_json('" + INPUT + "')";
    var cmd_dict_validate = {sqlText: command_validate};
    var stmt_validate = snowflake.createStatement(cmd_dict_validate);
    var rs_validate = stmt_validate.execute();
    rs_validate.next();
    var validate_result = rs_validate.getColumnValue(1);
if (validate_result.is_error > 0) {
    return validate_result;
} else {
    var command = "INSERT INTO employee(emp_id,emp_name,emp_address) VALUES(emp_id.nextval, '" + employee_name + "','" + employee_address + "')";
    var cmd_dict = {sqlText: command};
    var stmt = snowflake.createStatement(cmd_dict);
    var rs = stmt.execute();
    json_row["message"] = "successfully inserted employee";
}
} catch (err) {
    json_row["exception"] = err;
    error_count = 1;
}
json_row["is_error"] = error_count;
return json_row;
$$;

Let’s take a look at some sample runs.

call EMPLOYEE_INSERT_JSON('{
"employee_name": "Lucas", "employee_address": "Los Angeles"
}');

Result:
{ "is_error": 0, "message": "successfully inserted employee" }

Nice! That worked but let’s see what happens if we try to run the same command again.

call EMPLOYEE_INSERT_JSON('{
"employee_name": "Lucas", "employee_address": "Los Angeles"
}');

Result:
{"employee_name": "employee name already exists in table.", "is_error": 1 }

When we try it again our validate procedure finds that the employee name already exists!


Part 5 – Try Snoptimizer today!


Snoptimizer quickly and automatically optimizes your Snowflake account for security, cost, and performance. It eliminates headaches and concerns about security risks and cost overruns across your Snowflake account.

Try Snoptimizer today. Sign up and schedule a personal demo with us!


Part 6 – Conclusion:


Stored procedures are a great way to streamline your Snowflake tasks. They can also be used to grant higher-level access to lower-level users in a defined manner. I hope this tutorial has helped you create or transfer your stored procedures to Snowflake.

If you’re interested in trying out Snoptimizer, feel free to schedule a personal demo with us today.

Getting Started with Snowflake

Overview:


This overview describes how to get started using Snowflake. It covers logging into Snowflake through the web interface, command line interface, or other methods. It then provides an overview of the main tabs in the web interface: databases, shares, warehouses, worksheets, and history. The databases tab allows you to manage databases. The warehouse tab allows you to configure computational resources. The worksheet tab allows you to write and run SQL queries. The history tab shows the details of past queries. The overview also describes additional features like the help menu and user preferences.

Snowflake separates its computation engine from storage. This allows it to have the additional advantage of adaptive optimization. This means that Snowflake can automatically scale your cloud usage up or down based on your current needs. In other words, Snowflake saves a little (uses fewer resources) on every data operation, saving you long-term money.

If you’d like to check out Snowflake’s capabilities yourself, you can sign up for a complimentary account with $400 worth of credit here.


Setup Requirements:


  • Snowflake Account

    You can connect to Snowflake through:

    • A browser (easiest to start) • The command-line interface (CLI) • Programming libraries for your backend stack

    I recommend beginning with the browser. Then transition to the CLI or a library, depending on your backend.

  • Browser-based web interface
    • Minimum Version
    • Chrome: 47
    • Safari: 9
    • Firefox: 45
    • Opera: 36
    • Edge: 12
  • SnowSQL, Snowflake CLI
    • Redhat-compatible Linux operating systems
    • macOS (64-bit)
    • Windows (64-bit)
  • Client using JDBC or ODBC
    • Linux
    • MacOS
    • Windows
      • 64-bit for JDBC Driver
      • 32-bit or 64-bit for ODBC driver
  • Any 3rd party partner


Logging into Snowflake:


Account Name

All access to Snowflake is through your account name. You’ll need it to sign in and it’s part of the URL for browser access.

https://account_name.snowflakecomputing.com

The full account name may include the region and the cloud platform hosted by your account. Ex. account-name.us-east-2.aws


Logging into the Web Interface:


Go to the hostname provided by Snowflake for your account. The format should be:

https://account_name.snowflakecomputing.com

You should see the following screen.


https://snowflakesolutions.net/wp-content/uploads/word-image-3.png


Enter your credentials and Login.


Logging in Using SnowSQL


SnowSQL is the command line client for connecting to Snowflake and executing SQL queries and DDL and DML operations. To connect follow this quick guide.


Logging in Using Other Methods


In addition to the web interface and SnowSQL, Snowflake supports other methods for connecting.

  • 3rd-party clients services that support JDBC or ODBC
  • Developer applications that connect through drivers for Python, Node.js, Spark, etc.

These methods require additional installation and configuration. Check out this for details.


Web Interface


Snowflake web interface allows you to create/manage virtual warehouses, databases, and data objects. Use this interface to load data into tables, execute ad hoc queries, perform DML/DDL operations, and view past queries. You can also manage administrative tasks such as changing passwords and managing users. Check out Managing Your Snowflake Account for more information.

On the top of the UI, you’ll see the following tabs.


https://snowflakesolutions.net/wp-content/uploads/word-image-4.png

Databases


Databases show the databases you have access to. You can create, clone, drop, or transfer ownership of databases.

Tasks you perform on this page include:

  • Create, clone, or drop the database
  • Transfer ownership of the database

Click the name of a database to view and perform tasks on it:


https://snowflakesolutions.net/wp-content/uploads/word-image-5.png

Shares


Shares show data shared with your organization that you can use and data you are sharing with others.

This is a new page added to Snowflake. It allows you to consume shared data with your organization and provide data to others. Don’t worry about it for now.


Warehouses


Warehouses show the computational resources you can spin up to perform analytics. You can create, drop, suspend, resume, configure, or transfer warehouses.

Warehouses are Snowflake’s computational engines. You will define them by size (computational power) and spin them up to perform data analytics.

This page shows information about the virtual warehouses to create or can access. Tasks you can perform on this page include:

  • Create or drop a warehouse
  • Suspend or resume a warehouse
  • Configure a warehouse
  • Transfer ownership of a warehouse


Worksheet


https://snowflakesolutions.net/wp-content/uploads/word-image-6.png


Worksheets are where you can write and run SQL queries and DDL/DML operations. You can run queries, load SQL scripts, open multiple worksheets, save/reopen worksheets, resize warehouses, and export query results.


Tasks you can perform include:

  • Run ad hoc queries and other DDL/DML operations in a worksheet, or load SQL script files.
  • Open concurrent worksheets, each with its separate session.
  • Save and reopen worksheets.
  • Log out of Snowflake or switch roles within a worksheet, as well as refresh your browser, without losing your work:
    • If you log out of Snowflake, any active queries stop running.
    • If you’re in the middle of running queries when you refresh, they will resume running when the refresh is completed.
  • Resize the current warehouse to increase or decrease the compute resources utilized for executing your queries and DML statements.
  • Export the result for a selected statement (if the result is still available).

For more information, check out Using Worksheets for Queries.


History


https://snowflakesolutions.net/wp-content/uploads/history-page-in-the-snowflake-web-interface.png

History shows the details of queries run in the last 14 days. You can filter, scroll through, abort ongoing queries, view query details/results (for 24 hours), and change displayed columns.

The page displays a historical listing of queries, including queries executed from SnowSQL or other SQL clients.

Tasks you can perform include:

  • Filter queries displayed on the page.
  • Scroll through the list of displayed queries. The list includes (up to) 100 queries. At the bottom of the list, if more queries are available, you can continue searching.
  • Abort a query that has not been completed yet.
  • View the details for a query, including the result of the query. Query results are available for 24 hours. This limit is not adjustable.
  • Change the displayed columns, such as status, SQL text, ID, warehouse, and start and end time, by clicking any of the column headers.


Help Menu and User Preferences


On the top right, there is a drop-down menu from the help button. It supports the following actions:

  • View the Snowflake Documentation
  • Visit the Support Portal
  • Download the Snowflake clients by opening a dialog box where you can:
    • Download the Snowflake CLI client (SnowSQL) and ODBC driver.
    • View download info for the Snowflake JDBC driver, Python components, Node.js driver, and Snowflake Connector for Spark.
  • Show the help panel with context-sensitive help for the current page.

To the right of the help button is the user preferences. You can then change your password or security role for the session (if you have multiple roles assigned to you). For more information about security roles and how they influence the objects, you can see them in the interface, and for the tasks, you can perform, see Access Control in Snowflake.

You can also use this dropdown to:

  • Set your email address for notifications (if you are an account administrator).
  • Close your current session and exit the Snowflake web interface.


Conclusion:


This article summarized how to use Snowflake’s web interface to manage a cloud data warehouse. The interface has tabs for databases, data shares, virtual warehouses, SQL worksheets, and query history.

The “Databases” tab lists databases and allows creating, deleting, or cloning them. The “Shares” tab shows data shares controlling database and table access. The “Warehouses” tab manages warehouses required to run queries. Users can start, stop, resize, or unload warehouses. The “Worksheets” tab provides interfaces to run SQL queries and view results. Users can run ad-hoc queries or save common queries. The “Query History” tab lists query details like the user, warehouse, and time. This helps monitor usage, troubleshoot issues, and ensure compliance.

In summary, Snowflake’s web interface offers a centralized portal to manage a cloud data warehouse and run SQL queries for business insights.

SnowSQL CLI Client

Introduction – Snowsql CLI Client


SnowSQL is a command-line client for Snowflake, a cloud-based data warehousing and analytics platform. It allows you to execute SQL queries and perform all DDL and DML operations. It can be downloaded from the Snowflake Repository and has all the same capabilities as the Snowflake UI. It provides an easy way to access Snowflake right from your command line.


In this article we’ll discuss how to install and configure SnowSQL.


Steps to Activate SnowSQL CLI Client:


Step 1 – Download and Install SnowSQL CLI


1. Login into Snowflake and click on Help in the top right corner

2. Click on Downloads -> Snowflake Repository

3. Select Cli Client (snowsql) and click Snowflake Repository in the Downloads Dialog box.

https://snowflakesolutions.net/wp-content/uploads/word-image-12.png


This will lead you to a web index page.

4. Select the operating system where you want to install SnowSQL and click download.

https://snowflakesolutions.net/wp-content/uploads/word-image-13.png

5. Click on bootstrap -> 1.2 (or the newest version) -> Pick your OS (Darwin is Mac) -> Download the latest version

6. Run the installer.


Step 2 – Running SnowSQL CLI


2.1. Check SnowSQL is installed properly

Run: snowsql -v

Output: Version: 1.2.5 (or latest)

Good! Now that snowsql has been installed, let’s set up our environment to work.


2.3 Login to your account

snowsql -a account_name -u username

Account name can be found in the first part of your URL when logged into Snowflake (everything before snowflakecoputing.com, for instance, sample_username.sample_region.azure)


https://snowflakesolutions.net/wp-content/uploads/word-image-14.png

Setup the database context


// create a warehouse

CREATE WAREHOUSE yourname_WH AUTO_SUSPEND = 60 AUTO_RESUME=TRUE;

USE WAREHOUSE yourname_WH;

// select your desired database

USE DATABASE SNOWFLAKE_SAMPLE_DATA;

// select the data schema

USE SCHEMA TPCDS_SF100TCL;


https://snowflakesolutions.net/wp-content/uploads/word-image-15.png


(Note: Lukes-MacBook-Pro and lmunro are specific to my console. Yours will be different unless you somehow stole my laptop in which case please give it back.)

Awesome! Now we’re ready to perform whatever data analytics you desire.

However, it can be quite tedious to type in your account, username, password, warehouse, DB, and schema every time you log in. You can edit the snowSQL config file to perform these automatically.


Step 3 – Edit Config File


3.1 Locate the hidden snowsql folder

    • Linux/Mac OS: ~/.snowsql/
    • Windows: your-user-folder.snowsql


3.2 Open the file named config and add the following

[connections.configuration-name]

accountname = your_account_name

username = your_username

password = your_password

dbname = SNOWFLAKE_SAMPLE_DATA

warehousename = yourname_WH

schemaname = TPCDS_SF100TCL

  • Save and exit
  • Connect using the following command

snowsql -c configuration-name


https://snowflakesolutions.net/wp-content/uploads/word-image-16.png

Step 4 – Modify Display Prompt


SnowSQl prompt automatically displays the current user, warehouse, database, and schema. The tokens can be seen in the image above. This prompt can be a bit lengthy but you can edit the prompt with the following command:

!set prompt_format=>>

To auto-change the prompt format, add the following to the configuration file.

[options]

auto_completion gives you possible existing options, very helpful!

auto_completion = True

prompt_format=>>


Q&A’s Section:


1. What does the -c mean?


Whenever you run a program in the terminal you can specify arguments with a dash (-). The -c parameter tells the program snowsql to look in ~/.snowsql/config for a connection named lmunro_config. It then uses those credentials and other configurations to quickly log you in and set up your environment. Note: -c is an abbreviation. You can also use –connection.


2. Are there any other parameters that I should know about?


Yes! There are a bunch of parameters that can make your life easier. You can log in and set up your environment all in one line, like this:

snowsql -a **.east-us-2.azure -u lmunro -d SNOWFLAKE_SAMPLE_DATA -s TPCDS_SF100TCL -w LUCASMUNRO_WH

Don’t worry if that’s a bit overwhelming. You can (and should) use the config file so you don’t need to type it all out. If you’re interested in using these parameters or want more information check out the docs.


3. What is the config file?

The config file is a file that can be edited to set configuration and options for the SnowSQL CLI. It allows you to preset login credentials and database settings by adding a [connections] block and specify options by adding to the [options] block. For more information, you can check out the public documentation at https://docs.snowflake.com/en/user-guide/snowsql-config.html.


Conclusion


SnowSQL CLI is a quick way to plug into Snowflake directly from the terminal. It’s preferable to the UI if you already have a grasp of terminal operations and don’t require the UI to navigate around.

The config file in the SnowSQL folder is where you can set configuration and options for the CLI. You can preset login credentials and database settings by adding a [connections] block and specify options by adding to the [options] block. For more information check out the public documentation.

Snowflake and Python

Introduction

Python has become one of the go to languages for data analytics. I’m constantly using jupyter notebooks to quickly clean, analyze, and visualize data. That’s why I was ecstatic to learn that my favorite data warehouse, Snowflake, has a simple python connector. In fact, it took me just 10 minutes to set up my environment and start running analytics on some COVID-19 data!

Allow me to walk you through it.

Overview

The Snowflake Connector for Python provides an interface to develop Python applications which connect to Snowflake. The connector supports all standard operations.

Prerequisites

If you don’t have python yet, install it here.

This tutorial requires a minimum of Python 2.7.9 or Python 3.5.0, any version above that is supported. To check what version of Python you have installed on your machine, open terminal and run the following command:

python –version

If your python version is out of date, run this command to update:

python -m pip install –upgrade pip

Install Python Connector for Snowflake

Snowflake’s Python Connector is part of the Python Package Index (PyPI) so we can install it with pip or conda.

pip install –upgrade snowflake-connector-python
#Or (if your using python 3)
pip3 install –upgrade snowflake-connector-python
#Or (if you prefer conda)
conda install -c conda-forge snowflake-connector-python

Connecting to Snowflake with Python

Now that the connector is installed, let’s connect to Snowflake. I’m using jupyter notebooks but you can use any Python IDE for this. To begin, let’s import the Snowflake package we just downloaded.

import snowflake.connector

Now that we’ve imported the library, we’ll need 2 key pieces of information to connect to snowflake.

  • Snowflake account and region
  • User login and password

The snowflake account and region can be found in the URL when you log into Snowflake website. For example:

http://demo-account.demo-region.snowflakecomputing.com

The format is https://ACCOUNT.ACCOUNT_REGION.snowflakecomputing.com. So our account would be demo-account.demo-region. Your user information is the same you use to login to snowflake. We can create some variables to store this information.

sfAccount = ‘demo-account.demo-region’

sfUser = ‘demo-user’

sfPassword = ‘demo-pass’

Now we have all the information needed to use the Python connector in our application. The following example attempts to establish a connection and print out the version of snowflake we have running. If the connection fails, an error message is printed out.

import snowflake.connector

sfAccount = ‘demo-account.demo-region’
sfUser = ‘demo-user’
sfPass = ‘demo-pass’
// Connection object holds the connection and session information with the database alive
conn = snowflake.connector.connect(
user = sfUser,
password = sfPass,
account = sfAccount
)
// creates a cursor object to for execute and fetch operations
cs = conn.cursor()

try:
cs.execute(“SELECT current_version()”)
one_row = cs.fetchone()
print(one_row[0])
finally:
cs.close()
conn.close()

There you go! We’ve just connected to our snowflake database with python and retrieved some information. This should serve as a starting point for you to build your application. To dive deeper into what snowflake operations you can do with python check out the official documentation.

Secure Data Sharing with Snowflake

Introduction

Big Data. Internet of Things. Social Media. Everyday millions of data points are generated and moved across the internet, from the viral video you send to your friend on TikTok to critical business data to make decisions. The acceleration of data use and utility is only getting faster. That’s why security and protecting your data is of the utmost importance. That’s where Secure Data Sharing comes in play.

The cloud is the solution. Snowflake’s platform offers instant access to live data in a secure format. This feature can not only streamline data sharing inside organizations but also how we share data to the outside. Many companies continue to use outdated data sharing technologies which are more costly and less secure.

How Does Secure Data Sharing Work?

Sharing involves two parties: the data provider and one or more consumers. Snowflake enables sharing of database tables, views and user-defined functions (UDFs) using a Secure Share object. A data consumer given a Secure Share has access to a read-only version of the database in their own account to operate on.

With Snowflake’s data sharing, no actual data is copied or transferred between accounts. All sharing is accomplished through the service layer and metadata store. Thanks to Snowflake’s architecture and separate compute from storage, data sharing is instant and prevents storage costs.

Sharing is done with a Secure Share object. Each Secure Share includes: privileges that grant access to the database, schema, consumer accounts and objects being shared (tables, views, UDFS). The share object represents a connection between the provider and consumer. New objects or data can be added to the object and will be available to the consumer in real time. Access to a share can be revoked at any time as well.

Two Types of Consumers

Participates in Secure Data Sharing are either data provider or consumer. A provider creates a Secure Share to export, and the consumer imports the Secure Share. However, there are two different types of consumers: reader accounts and full consumer. The difference affects who pays for the storage resources.

Full consumer accounts are existing Snowflake customers. Data can be shared directly to the existing account and the existing account pays for all computer resources incurred by querying the database.

Reader accounts are from consumers not on Snowflake’s platform. If the consumer is not a Snowflake customer, the provider can create Reader Accounts. For a Reader Account, all costs would be paid by the provider who shared the data. All costs can be tracked and invoiced back to the consumer.

Setting up a Secure Share with Reader Account

Let’s begin with an example using my personal database (BDU), which has a schema containing flight data (FAA). There are eight tables in the schema:

Click the Shares tab at the top of the user console, making sure that you toggle the view to Outbound since you are a provider creating a Secure Share that will go to an outside account. Then hit the Create button to open the menu to create a Secure Share. Please note that you need ACCOUNTADMIN privileges, or a custom role that has been granted these specific privileges, to create a Secure Share. SYSADMIN privileges will not be enough:

In the menu, insert the Secure Share Name (SHAREDEMO), and click the button to Select Tables & Secure Views to select the eight tables. Please note that you can select or deselect tables or views as needed. Next, hit the Create button to complete the process:

Now you see that Secure Share has been created and the data can be previewed. Please note that you need an available Virtual Warehouse that is usable by your current role in order to run this query. Next, click the button to Add Consumers:

As you can see, there are two Account Types: Reader and Full. Full is an existing user which will assume costs. Reader does not, the data provider pays for them. In this case, the intended consumer is not a Snowflake customer, so click the Create a Reader account link:

To create a Reader Account, insert the name (READERACCOUNT) and a comment (optional), along with credentials for the ACCOUNTADMIN user (READER1). Then click Create Account:

Going back to a worksheet and executing the command SHOW MANAGED ACCOUNTS will show all details needed:

Going back to the previous Add Consumers menu, you can now see that the new Reader Account has been added as a Consumer of the Secure Share. Clicking the blue link with the account locator (XB28199) will also take you the login for the Reader Account:

Enter the credentials for the ACCOUNTADMIN user:

Once you are in your Reader Account, you will need to do some setup. First, ensure that your role is ACCOUNTADMIN (it will default to SYSADMIN). Then click the Warehouses tab and create a warehouse to use (DEMO_WH). You will need compute resources to run queries from your provider.

Click the Shares account, making sure that you are toggled to Inbound. We see the SHAREDEMO has been shared to us by the ITSTRATEGISTS account we were using, which is the data provider in this case. Click Create Database From Secure Share:

In the menu, name your database accordingly and grant access to the desired roles. You can change the name of the database given by the provider. You can grant access to the database to multiple roles. Click Create Database:

Navigate to Worksheets. The shared database (SHARE_FAA) now has read-only tables you can query using the SYSADMIN role. As the consumer, you should be able to read from it using a reporting tool like Tableau or an ETL tool. If you’re a Full Consumer, you can query this data along with your existing data while not paying any storage costs.

Database tables are read-only. To change this, you can create another database and table by selecting from the shared tables. In this case, a table that has 148 million records took 27 seconds to move over using a medium-sized warehouse. Unfortunately, you cannot use Snowflake’s clone feature on a shared database.

Frequently Asked Questions

What is the difference between sharing data with existing Snowflake customers versus non-Snowflake customers?

Existing Snowflake customers bear the costs of any storage or compute incurred from querying or copying the shared database. For a non-Snowflake customer, the provider would create Reader Accounts and pay for all the costs incurred by those accounts. As the provider, you would be able to track account usage and bill the consumer if that was part of the set business agreement.

How fast would the data update for consumers?

Instant! The data is stored and shared on the cloud so the provider and consumer see the same data. The Secure Share is a metadata wrapper that points to the correct data that is still sitting with the provider. So any changes to the provider’s dataset would be reflected instantly from the consumer’s viewpoint.

Once the consumers can see the data in their account, what can they do with it?

They can query and run any analytics they desire such as Tableau or Sigma. If they wish to manipulate the data, they can copy that data into their own database, so they would have write access as.

Can I allow my users to see only selected tables or views?

Yes! Snowflake has a role-based security framework, so the Account Administrator can limit which roles are accessible to certain users. Roles are a collection of permissions granted on objects. Therefore, what a user can see depends on what permissions have been granted to the user’s role.

What if my consumers go overboard with how much they are using the Reader Account?

As the data provider for Reader Accounts you control usage. Set up Resource Monitors, which impose limits on the number of credits that virtual warehouses use within a specified interval or date range. When these limits are reached or are approaching, the Resource Monitor can trigger an alert and suspension of the warehouse.

THE SNOWFLAKE SUMMIT RECAP – 2019

THE SNOWFLAKE SUMMIT RECAP – 2019

The first snowflake summit finally happened from June 3rd to 6th and lived up to the expectation of many people who were interested in the summit. The four days summit had more than two thousand attendees, one hundred and twenty presentations across seven tracks, seven keynote presentations, more than thirty hands-on labs, more than thirty-five theatre sessions, and more than thirty countries represented by the attendees.

A quick recap of the summit…

Day 1

The first day of the summit majorly involved attendees of the summit undertaking an essential snowflake training which ended with the trainees taking an exam. This was a smooth and exciting experience as people were placed in rooms where they had their background scripts and environments with snowflake representatives ready to help anyone out. The exam was made of two parts, the first part was made of multiple choices relating to the training done, and the second part was done upon passing the first part, which was practical. The practical involved creating a user, a database, and a table that loaded from a Google spreadsheet, and executing various transformations that would load in the final table.

Day 2

The significant aspects of the day involved making important announcements about new snowflake features. The features included snowflake being available on Google cloud, external tables, snowflake organizations, data replication, data exchange, and data pipeline. The significant announcements are explained below:

  •      Snowflake announced that it would be available on the Google platform for 2020. This would ensure that organizations using snowflake get seamless and secure data integration across various platforms, thus enabling them to choose the right vendor for their business. It will also be easy for customers to utilize Google’s ecosystem of applications. Customers also can use the Google cloud platform and manage applications across multiple clouds.
  •      Snowflake also introduced new data pipeline features that allow customers to query data directly from their data lake on Azure Blob Storage or AWS S3 which enables them to maintain the data lake as the single source of truth.
  •      Snowflake’s data exchange is currently available for viewing privately with public viewing being set for later in the year. The data exchange is free to join marketplace for enabling users to connect with data providers for seamlessly discovering assessing and generating insights from the user’s data.

Day 3

The keynotes on the third day started with Alison Levine, who is the author of “on edge,” giving an informative talk on leadership. The founders of snowflake Benoît Dageville, who is the current president of products, and Thierry Cruanes, who is the current CTO, also gave a talk on the reason for starting snowflake. They did this by referencing their vision of; “Simply load and query data”. The day ended with Kevin O’Brien of Kiva.org and Julie Dodd of Parkinson’s UK showing how data could be used to make the world a better place.

Day 4

The last day of the summit saw Matthew Glickman, the Snowflake VP of Customer and Product Strategy, giving a closing keynote on some of its customer’s journey to be data-driven. Some of the customer representatives invited on stage included Brian Dumman, Chief Data and Analytics Officer, McKesson, Yaniv Bar-Dayan, Cofounder and CEO, Vulcan Cyber, and Michal Klos, Senior Director of Engineering, Indigo/Localytics. By the end of the summit, it was clear that the future of data had arrived with snowflake having the capability of providing trusted data solutions to its customers.

The 2020 summit will be better

The 2020 summit will be held on June 1st to 4th at the Aria Hotel in Las Vegas, which is a bigger venue. Considering the success of the snowflake 2019 summit, the 2020 summit will be more significant and will have more activities. I honestly can’t wait for it.

Find out more about all the benefits Snowflake has to offer you and your business. Sign up for a free proof of concept!