Snowflake Stored Procedures

Part 1 – Introduction


Today’s article provides an introduction to stored procedures in Snowflake, which can be used to create modular code with complex business logic by combining SQL statements with procedural logic. The article discusses the benefits of stored procedures, including error handling and dynamically creating SQL statements, and provides examples of how to create and use stored procedures in Snowflake.


Part 2 – What are Snowflake Stored Procedures?


Snowflake stored procedures can be thought of as a function that enables users to create modular code with complex business logic by combining multiple SQL statements with procedural logic. They are used for data migration and validation while handling exceptions. Benefits of stored procedures include procedural logic such as branching and looping, error handling, dynamically creating SQL statements to execute, and executing code with the privileges of the stored procedure creator. A Stored Procedure is created with a CREATE PROCEDURE command and is executed with a CALL command. A Stored Procedure uses JavaScript for logic and control and SQL is used to call the JavaScript API.


Part 3 – Benefits of Stored Procedures include:


  • Procedural logic such as branching and looping which straight SQL does not support.
  • Error handling.
  • Dynamically creating SQL statements to execute.
  • Executing code with the privileges of the stored procedures creator. This allows stored procedure owners to delegate power to perform operations to users who otherwise could not.

A Stored Procedure is created with a CREATE PROCEDURE command and is executed with a CALL command. The result is returned as a single value. A Stored Procedure uses JavaScript for logic and control and SQL is used to call the JavaScript API.


Part 4 – Stored Procedure Examples:


Let’s say we want to insert a row using a stored procedure.

First, let’s create a database and table to use.

USE DATABASE DEMO_DB;
CREATE OR REPLACE TABLE Employee(emp_id INT, emp_name varchar,emp_address varchar);
create sequence if not exists emp_id;

Now that we have that setup, let’s create our first stored procedure.

CREATE OR REPLACE PROCEDURE employee_insert(name varchar, address varchar)
RETURNS VARCHAR
LANGUAGE JAVASCRIPT
AS
$$
var command = "INSERT INTO Employee (emp_id, emp_name, emp_address) VALUES (emp_id.nextval, '"+NAME+"','"+ADDRESS+"')";
var cmd_dict = {sqlText: command};
var stmt = snowflake.createStatement(cmd_dict);
var rs = stmt.execute();
return 'success';
$$;

In the first section, we define the SPs name, parameters, return value, and language. Then between the $$, we write the actual code. Now that everything is setup, we can use the SP with the CALL command like this:

CALL employee_insert('Name','Location');

Let’s give this a try and see what happens!

https://snowflakesolutions.net/wp-content/uploads/word-image-17.png


Awesome! That worked!

Make sure to use a database that exists in your console if you’re replicating this.

However, a simple insert isn’t particularly useful for a Stored Procedure. We’d be better off just using pure SQL. Let’s look at a more realistic example that better demonstrates the power of Stored Procedures.


Taking it Further


Let’s imagine the following scenario. You receive an employee’s data in JSON. You want to store it on the table but you have to ensure the following first:

  • Employee name cannot be empty or NULL
  • Employee name must be unique
  • Employee address cannot be NULL

It is possible to do all of this using a single stored procedure. However, since we have two distinct tasks — validation and insert — it’s better practice to break them up into 2 separate procedures. We’ll then call the validation procedure from inside the insert procedure. We’ll be utilizing Snowflake’s variant type to return a json object. Let’s take a look at our validate procedure.


Validate Procedure


create or replace procedure employee_validate_json(INPUT VARCHAR)
RETURNS VARIANT NOT NULL
LANGUAGE JAVASCRIPT
AS
$$
var json_row = {};
var error_count = 0;
try {
    var employee_data = JSON.parse(INPUT);
    var employee_id = employee_data.employee_id;
    var employee_name = employee_data.employee_name;
    var employee_address = employee_data.employee_address;
    if (!employee_name) {
        json_row["employee_name"] = "employee name cannot be empty or null.";
        error_count = 1;
    } else {
        var command = "select count(*) from Employee where emp_name='"+ employee_name + "'";
        var stmt = snowflake.createStatement({sqlText: command});
        var res = stmt.execute();
        res.next();
        row_count = res.getColumnValue(1);
// check for duplicate
    if (row_count > 0) {
        json_row["employee_name"] = "employee name already exists in table.";
        error_count = 1;
    }
}
if (employee_address == null || employee_address == undefined) {
    json_row["employee_address"] = "employee address should not be NULL.";
    error_count = 1;
}
json_row["is_error"] = error_count;
} catch (err) {
    json_row["Exception"] = "Exception: " + err;
    json_row["is_error"] = 1;
}
return json_row;
$$;

The stored procedure will either return is_error = 0 if there is nothing wrong with our JSON or return is_error = 1 with the appropriate error message.

Successful run:

call EMPLOYEE_VALIDATE_JSON('{
"employee_name": "Lucas", "employee_address": "Los Angeles"
}');

Result:
{ "is_error": 0 }

Error run:

call EMPLOYEE_VALIDATE_JSON('{
"employee_name": "", "employee_address": "Los Angeles"
}');

Result:
{"employee_name": "employee name cannot be empty or null.", "is_error": 1 }

Now that we have our validation working. Let’s dive into our insert procedure!


Insert Procedure


Our insert procedure is going to call our validate procedure and check for any errors. If it finds any, it will return them. If not, it will attempt to insert the data into the table. Also returning a json upon completion.

create or replace procedure employee_insert_json(INPUT VARCHAR)
RETURNS VARIANT NOT NULL
LANGUAGE JAVASCRIPT
AS
$$
var json_row = {};
var message = {};
var detail = {};
var result = '';
var error_count = 0;
try {
    var employee_data = JSON.parse(INPUT);
    var employee_name = employee_data.employee_name;
    var employee_address = employee_data.employee_address;
    var command_validate = "call employee_validate_json('" + INPUT + "')";
    var cmd_dict_validate = {sqlText: command_validate};
    var stmt_validate = snowflake.createStatement(cmd_dict_validate);
    var rs_validate = stmt_validate.execute();
    rs_validate.next();
    var validate_result = rs_validate.getColumnValue(1);
if (validate_result.is_error > 0) {
    return validate_result;
} else {
    var command = "INSERT INTO employee(emp_id,emp_name,emp_address) VALUES(emp_id.nextval, '" + employee_name + "','" + employee_address + "')";
    var cmd_dict = {sqlText: command};
    var stmt = snowflake.createStatement(cmd_dict);
    var rs = stmt.execute();
    json_row["message"] = "successfully inserted employee";
}
} catch (err) {
    json_row["exception"] = err;
    error_count = 1;
}
json_row["is_error"] = error_count;
return json_row;
$$;

Let’s take a look at some sample runs.

call EMPLOYEE_INSERT_JSON('{
"employee_name": "Lucas", "employee_address": "Los Angeles"
}');

Result:
{ "is_error": 0, "message": "successfully inserted employee" }

Nice! That worked but let’s see what happens if we try to run the same command again.

call EMPLOYEE_INSERT_JSON('{
"employee_name": "Lucas", "employee_address": "Los Angeles"
}');

Result:
{"employee_name": "employee name already exists in table.", "is_error": 1 }

When we try it again our validate procedure finds that the employee name already exists!


Part 5 – Try Snoptimizer today!


Snoptimizer quickly and automatically optimizes your Snowflake account for security, cost, and performance. It eliminates headaches and concerns about security risks and cost overruns across your Snowflake account.

Try Snoptimizer today. Sign up and schedule a personal demo with us!


Part 6 – Conclusion:


Stored procedures are a great way to streamline your Snowflake tasks. They can also be used to grant higher-level access to lower-level users in a defined manner. I hope this tutorial has helped you create or transfer your stored procedures to Snowflake.

If you’re interested in trying out Snoptimizer, feel free to schedule a personal demo with us today.

Getting Started with Snowflake

Overview:


This overview describes how to get started using Snowflake. It covers logging into Snowflake through the web interface, command line interface, or other methods. It then provides an overview of the main tabs in the web interface: databases, shares, warehouses, worksheets, and history. The databases tab allows you to manage databases. The warehouse tab allows you to configure computational resources. The worksheet tab allows you to write and run SQL queries. The history tab shows the details of past queries. The overview also describes additional features like the help menu and user preferences.

Snowflake separates its computation engine from storage. This allows it to have the additional advantage of adaptive optimization. This means that Snowflake can automatically scale your cloud usage up or down based on your current needs. In other words, Snowflake saves a little (uses fewer resources) on every data operation, saving you long-term money.

If you’d like to check out Snowflake’s capabilities yourself, you can sign up for a complimentary account with $400 worth of credit here.


Setup Requirements:


  • Snowflake Account

    You can connect to Snowflake through:

    • A browser (easiest to start) • The command-line interface (CLI) • Programming libraries for your backend stack

    I recommend beginning with the browser. Then transition to the CLI or a library, depending on your backend.

  • Browser-based web interface
    • Minimum Version
    • Chrome: 47
    • Safari: 9
    • Firefox: 45
    • Opera: 36
    • Edge: 12
  • SnowSQL, Snowflake CLI
    • Redhat-compatible Linux operating systems
    • macOS (64-bit)
    • Windows (64-bit)
  • Client using JDBC or ODBC
    • Linux
    • MacOS
    • Windows
      • 64-bit for JDBC Driver
      • 32-bit or 64-bit for ODBC driver
  • Any 3rd party partner


Logging into Snowflake:


Account Name

All access to Snowflake is through your account name. You’ll need it to sign in and it’s part of the URL for browser access.

https://account_name.snowflakecomputing.com

The full account name may include the region and the cloud platform hosted by your account. Ex. account-name.us-east-2.aws


Logging into the Web Interface:


Go to the hostname provided by Snowflake for your account. The format should be:

https://account_name.snowflakecomputing.com

You should see the following screen.


https://snowflakesolutions.net/wp-content/uploads/word-image-3.png


Enter your credentials and Login.


Logging in Using SnowSQL


SnowSQL is the command line client for connecting to Snowflake and executing SQL queries and DDL and DML operations. To connect follow this quick guide.


Logging in Using Other Methods


In addition to the web interface and SnowSQL, Snowflake supports other methods for connecting.

  • 3rd-party clients services that support JDBC or ODBC
  • Developer applications that connect through drivers for Python, Node.js, Spark, etc.

These methods require additional installation and configuration. Check out this for details.


Web Interface


Snowflake web interface allows you to create/manage virtual warehouses, databases, and data objects. Use this interface to load data into tables, execute ad hoc queries, perform DML/DDL operations, and view past queries. You can also manage administrative tasks such as changing passwords and managing users. Check out Managing Your Snowflake Account for more information.

On the top of the UI, you’ll see the following tabs.


https://snowflakesolutions.net/wp-content/uploads/word-image-4.png

Databases


Databases show the databases you have access to. You can create, clone, drop, or transfer ownership of databases.

Tasks you perform on this page include:

  • Create, clone, or drop the database
  • Transfer ownership of the database

Click the name of a database to view and perform tasks on it:


https://snowflakesolutions.net/wp-content/uploads/word-image-5.png

Shares


Shares show data shared with your organization that you can use and data you are sharing with others.

This is a new page added to Snowflake. It allows you to consume shared data with your organization and provide data to others. Don’t worry about it for now.


Warehouses


Warehouses show the computational resources you can spin up to perform analytics. You can create, drop, suspend, resume, configure, or transfer warehouses.

Warehouses are Snowflake’s computational engines. You will define them by size (computational power) and spin them up to perform data analytics.

This page shows information about the virtual warehouses to create or can access. Tasks you can perform on this page include:

  • Create or drop a warehouse
  • Suspend or resume a warehouse
  • Configure a warehouse
  • Transfer ownership of a warehouse


Worksheet


https://snowflakesolutions.net/wp-content/uploads/word-image-6.png


Worksheets are where you can write and run SQL queries and DDL/DML operations. You can run queries, load SQL scripts, open multiple worksheets, save/reopen worksheets, resize warehouses, and export query results.


Tasks you can perform include:

  • Run ad hoc queries and other DDL/DML operations in a worksheet, or load SQL script files.
  • Open concurrent worksheets, each with its separate session.
  • Save and reopen worksheets.
  • Log out of Snowflake or switch roles within a worksheet, as well as refresh your browser, without losing your work:
    • If you log out of Snowflake, any active queries stop running.
    • If you’re in the middle of running queries when you refresh, they will resume running when the refresh is completed.
  • Resize the current warehouse to increase or decrease the compute resources utilized for executing your queries and DML statements.
  • Export the result for a selected statement (if the result is still available).

For more information, check out Using Worksheets for Queries.


History


https://snowflakesolutions.net/wp-content/uploads/history-page-in-the-snowflake-web-interface.png

History shows the details of queries run in the last 14 days. You can filter, scroll through, abort ongoing queries, view query details/results (for 24 hours), and change displayed columns.

The page displays a historical listing of queries, including queries executed from SnowSQL or other SQL clients.

Tasks you can perform include:

  • Filter queries displayed on the page.
  • Scroll through the list of displayed queries. The list includes (up to) 100 queries. At the bottom of the list, if more queries are available, you can continue searching.
  • Abort a query that has not been completed yet.
  • View the details for a query, including the result of the query. Query results are available for 24 hours. This limit is not adjustable.
  • Change the displayed columns, such as status, SQL text, ID, warehouse, and start and end time, by clicking any of the column headers.


Help Menu and User Preferences


On the top right, there is a drop-down menu from the help button. It supports the following actions:

  • View the Snowflake Documentation
  • Visit the Support Portal
  • Download the Snowflake clients by opening a dialog box where you can:
    • Download the Snowflake CLI client (SnowSQL) and ODBC driver.
    • View download info for the Snowflake JDBC driver, Python components, Node.js driver, and Snowflake Connector for Spark.
  • Show the help panel with context-sensitive help for the current page.

To the right of the help button is the user preferences. You can then change your password or security role for the session (if you have multiple roles assigned to you). For more information about security roles and how they influence the objects, you can see them in the interface, and for the tasks, you can perform, see Access Control in Snowflake.

You can also use this dropdown to:

  • Set your email address for notifications (if you are an account administrator).
  • Close your current session and exit the Snowflake web interface.


Conclusion:


This article summarized how to use Snowflake’s web interface to manage a cloud data warehouse. The interface has tabs for databases, data shares, virtual warehouses, SQL worksheets, and query history.

The “Databases” tab lists databases and allows creating, deleting, or cloning them. The “Shares” tab shows data shares controlling database and table access. The “Warehouses” tab manages warehouses required to run queries. Users can start, stop, resize, or unload warehouses. The “Worksheets” tab provides interfaces to run SQL queries and view results. Users can run ad-hoc queries or save common queries. The “Query History” tab lists query details like the user, warehouse, and time. This helps monitor usage, troubleshoot issues, and ensure compliance.

In summary, Snowflake’s web interface offers a centralized portal to manage a cloud data warehouse and run SQL queries for business insights.

SnowSQL CLI Client

Introduction – Snowsql CLI Client


SnowSQL is a command-line client for Snowflake, a cloud-based data warehousing and analytics platform. It allows you to execute SQL queries and perform all DDL and DML operations. It can be downloaded from the Snowflake Repository and has all the same capabilities as the Snowflake UI. It provides an easy way to access Snowflake right from your command line.


In this article we’ll discuss how to install and configure SnowSQL.


Steps to Activate SnowSQL CLI Client:


Step 1 – Download and Install SnowSQL CLI


1. Login into Snowflake and click on Help in the top right corner

2. Click on Downloads -> Snowflake Repository

3. Select Cli Client (snowsql) and click Snowflake Repository in the Downloads Dialog box.

https://snowflakesolutions.net/wp-content/uploads/word-image-12.png


This will lead you to a web index page.

4. Select the operating system where you want to install SnowSQL and click download.

https://snowflakesolutions.net/wp-content/uploads/word-image-13.png

5. Click on bootstrap -> 1.2 (or the newest version) -> Pick your OS (Darwin is Mac) -> Download the latest version

6. Run the installer.


Step 2 – Running SnowSQL CLI


2.1. Check SnowSQL is installed properly

Run: snowsql -v

Output: Version: 1.2.5 (or latest)

Good! Now that snowsql has been installed, let’s set up our environment to work.


2.3 Login to your account

snowsql -a account_name -u username

Account name can be found in the first part of your URL when logged into Snowflake (everything before snowflakecoputing.com, for instance, sample_username.sample_region.azure)


https://snowflakesolutions.net/wp-content/uploads/word-image-14.png

Setup the database context


// create a warehouse

CREATE WAREHOUSE yourname_WH AUTO_SUSPEND = 60 AUTO_RESUME=TRUE;

USE WAREHOUSE yourname_WH;

// select your desired database

USE DATABASE SNOWFLAKE_SAMPLE_DATA;

// select the data schema

USE SCHEMA TPCDS_SF100TCL;


https://snowflakesolutions.net/wp-content/uploads/word-image-15.png


(Note: Lukes-MacBook-Pro and lmunro are specific to my console. Yours will be different unless you somehow stole my laptop in which case please give it back.)

Awesome! Now we’re ready to perform whatever data analytics you desire.

However, it can be quite tedious to type in your account, username, password, warehouse, DB, and schema every time you log in. You can edit the snowSQL config file to perform these automatically.


Step 3 – Edit Config File


3.1 Locate the hidden snowsql folder

    • Linux/Mac OS: ~/.snowsql/
    • Windows: your-user-folder.snowsql


3.2 Open the file named config and add the following

[connections.configuration-name]

accountname = your_account_name

username = your_username

password = your_password

dbname = SNOWFLAKE_SAMPLE_DATA

warehousename = yourname_WH

schemaname = TPCDS_SF100TCL

  • Save and exit
  • Connect using the following command

snowsql -c configuration-name


https://snowflakesolutions.net/wp-content/uploads/word-image-16.png

Step 4 – Modify Display Prompt


SnowSQl prompt automatically displays the current user, warehouse, database, and schema. The tokens can be seen in the image above. This prompt can be a bit lengthy but you can edit the prompt with the following command:

!set prompt_format=>>

To auto-change the prompt format, add the following to the configuration file.

[options]

auto_completion gives you possible existing options, very helpful!

auto_completion = True

prompt_format=>>


Q&A’s Section:


1. What does the -c mean?


Whenever you run a program in the terminal you can specify arguments with a dash (-). The -c parameter tells the program snowsql to look in ~/.snowsql/config for a connection named lmunro_config. It then uses those credentials and other configurations to quickly log you in and set up your environment. Note: -c is an abbreviation. You can also use –connection.


2. Are there any other parameters that I should know about?


Yes! There are a bunch of parameters that can make your life easier. You can log in and set up your environment all in one line, like this:

snowsql -a **.east-us-2.azure -u lmunro -d SNOWFLAKE_SAMPLE_DATA -s TPCDS_SF100TCL -w LUCASMUNRO_WH

Don’t worry if that’s a bit overwhelming. You can (and should) use the config file so you don’t need to type it all out. If you’re interested in using these parameters or want more information check out the docs.


3. What is the config file?

The config file is a file that can be edited to set configuration and options for the SnowSQL CLI. It allows you to preset login credentials and database settings by adding a [connections] block and specify options by adding to the [options] block. For more information, you can check out the public documentation at https://docs.snowflake.com/en/user-guide/snowsql-config.html.


Conclusion


SnowSQL CLI is a quick way to plug into Snowflake directly from the terminal. It’s preferable to the UI if you already have a grasp of terminal operations and don’t require the UI to navigate around.

The config file in the SnowSQL folder is where you can set configuration and options for the CLI. You can preset login credentials and database settings by adding a [connections] block and specify options by adding to the [options] block. For more information check out the public documentation.

Snowflake and Python

Introduction

Python has become one of the go to languages for data analytics. I’m constantly using jupyter notebooks to quickly clean, analyze, and visualize data. That’s why I was ecstatic to learn that my favorite data warehouse, Snowflake, has a simple python connector. In fact, it took me just 10 minutes to set up my environment and start running analytics on some COVID-19 data!

Allow me to walk you through it.

Overview

The Snowflake Connector for Python provides an interface to develop Python applications which connect to Snowflake. The connector supports all standard operations.

Prerequisites

If you don’t have python yet, install it here.

This tutorial requires a minimum of Python 2.7.9 or Python 3.5.0, any version above that is supported. To check what version of Python you have installed on your machine, open terminal and run the following command:

python –version

If your python version is out of date, run this command to update:

python -m pip install –upgrade pip

Install Python Connector for Snowflake

Snowflake’s Python Connector is part of the Python Package Index (PyPI) so we can install it with pip or conda.

pip install –upgrade snowflake-connector-python
#Or (if your using python 3)
pip3 install –upgrade snowflake-connector-python
#Or (if you prefer conda)
conda install -c conda-forge snowflake-connector-python

Connecting to Snowflake with Python

Now that the connector is installed, let’s connect to Snowflake. I’m using jupyter notebooks but you can use any Python IDE for this. To begin, let’s import the Snowflake package we just downloaded.

import snowflake.connector

Now that we’ve imported the library, we’ll need 2 key pieces of information to connect to snowflake.

  • Snowflake account and region
  • User login and password

The snowflake account and region can be found in the URL when you log into Snowflake website. For example:

http://demo-account.demo-region.snowflakecomputing.com

The format is https://ACCOUNT.ACCOUNT_REGION.snowflakecomputing.com. So our account would be demo-account.demo-region. Your user information is the same you use to login to snowflake. We can create some variables to store this information.

sfAccount = ‘demo-account.demo-region’

sfUser = ‘demo-user’

sfPassword = ‘demo-pass’

Now we have all the information needed to use the Python connector in our application. The following example attempts to establish a connection and print out the version of snowflake we have running. If the connection fails, an error message is printed out.

import snowflake.connector

sfAccount = ‘demo-account.demo-region’
sfUser = ‘demo-user’
sfPass = ‘demo-pass’
// Connection object holds the connection and session information with the database alive
conn = snowflake.connector.connect(
user = sfUser,
password = sfPass,
account = sfAccount
)
// creates a cursor object to for execute and fetch operations
cs = conn.cursor()

try:
cs.execute(“SELECT current_version()”)
one_row = cs.fetchone()
print(one_row[0])
finally:
cs.close()
conn.close()

There you go! We’ve just connected to our snowflake database with python and retrieved some information. This should serve as a starting point for you to build your application. To dive deeper into what snowflake operations you can do with python check out the official documentation.

Secure Data Sharing with Snowflake

Introduction

Big Data. Internet of Things. Social Media. Everyday millions of data points are generated and moved across the internet, from the viral video you send to your friend on TikTok to critical business data to make decisions. The acceleration of data use and utility is only getting faster. That’s why security and protecting your data is of the utmost importance. That’s where Secure Data Sharing comes in play.

The cloud is the solution. Snowflake’s platform offers instant access to live data in a secure format. This feature can not only streamline data sharing inside organizations but also how we share data to the outside. Many companies continue to use outdated data sharing technologies which are more costly and less secure.

How Does Secure Data Sharing Work?

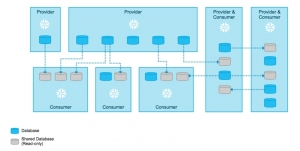
Sharing involves two parties: the data provider and one or more consumers. Snowflake enables sharing of database tables, views and user-defined functions (UDFs) using a Secure Share object. A data consumer given a Secure Share has access to a read-only version of the database in their own account to operate on.

With Snowflake’s data sharing, no actual data is copied or transferred between accounts. All sharing is accomplished through the service layer and metadata store. Thanks to Snowflake’s architecture and separate compute from storage, data sharing is instant and prevents storage costs.

Sharing is done with a Secure Share object. Each Secure Share includes: privileges that grant access to the database, schema, consumer accounts and objects being shared (tables, views, UDFS). The share object represents a connection between the provider and consumer. New objects or data can be added to the object and will be available to the consumer in real time. Access to a share can be revoked at any time as well.

Two Types of Consumers

Participates in Secure Data Sharing are either data provider or consumer. A provider creates a Secure Share to export, and the consumer imports the Secure Share. However, there are two different types of consumers: reader accounts and full consumer. The difference affects who pays for the storage resources.

Full consumer accounts are existing Snowflake customers. Data can be shared directly to the existing account and the existing account pays for all computer resources incurred by querying the database.

Reader accounts are from consumers not on Snowflake’s platform. If the consumer is not a Snowflake customer, the provider can create Reader Accounts. For a Reader Account, all costs would be paid by the provider who shared the data. All costs can be tracked and invoiced back to the consumer.

Setting up a Secure Share with Reader Account

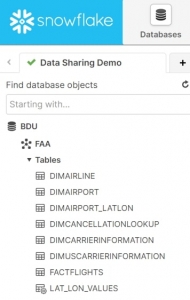
Let’s begin with an example using my personal database (BDU), which has a schema containing flight data (FAA). There are eight tables in the schema:

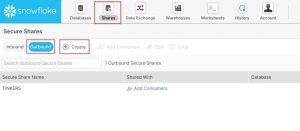
Click the Shares tab at the top of the user console, making sure that you toggle the view to Outbound since you are a provider creating a Secure Share that will go to an outside account. Then hit the Create button to open the menu to create a Secure Share. Please note that you need ACCOUNTADMIN privileges, or a custom role that has been granted these specific privileges, to create a Secure Share. SYSADMIN privileges will not be enough:

In the menu, insert the Secure Share Name (SHAREDEMO), and click the button to Select Tables & Secure Views to select the eight tables. Please note that you can select or deselect tables or views as needed. Next, hit the Create button to complete the process:

Now you see that Secure Share has been created and the data can be previewed. Please note that you need an available Virtual Warehouse that is usable by your current role in order to run this query. Next, click the button to Add Consumers:

As you can see, there are two Account Types: Reader and Full. Full is an existing user which will assume costs. Reader does not, the data provider pays for them. In this case, the intended consumer is not a Snowflake customer, so click the Create a Reader account link:

To create a Reader Account, insert the name (READERACCOUNT) and a comment (optional), along with credentials for the ACCOUNTADMIN user (READER1). Then click Create Account:

Going back to a worksheet and executing the command SHOW MANAGED ACCOUNTS will show all details needed:

Going back to the previous Add Consumers menu, you can now see that the new Reader Account has been added as a Consumer of the Secure Share. Clicking the blue link with the account locator (XB28199) will also take you the login for the Reader Account:

Enter the credentials for the ACCOUNTADMIN user:

Once you are in your Reader Account, you will need to do some setup. First, ensure that your role is ACCOUNTADMIN (it will default to SYSADMIN). Then click the Warehouses tab and create a warehouse to use (DEMO_WH). You will need compute resources to run queries from your provider.

Click the Shares account, making sure that you are toggled to Inbound. We see the SHAREDEMO has been shared to us by the ITSTRATEGISTS account we were using, which is the data provider in this case. Click Create Database From Secure Share:

In the menu, name your database accordingly and grant access to the desired roles. You can change the name of the database given by the provider. You can grant access to the database to multiple roles. Click Create Database:

Navigate to Worksheets. The shared database (SHARE_FAA) now has read-only tables you can query using the SYSADMIN role. As the consumer, you should be able to read from it using a reporting tool like Tableau or an ETL tool. If you’re a Full Consumer, you can query this data along with your existing data while not paying any storage costs.

Database tables are read-only. To change this, you can create another database and table by selecting from the shared tables. In this case, a table that has 148 million records took 27 seconds to move over using a medium-sized warehouse. Unfortunately, you cannot use Snowflake’s clone feature on a shared database.

Frequently Asked Questions

What is the difference between sharing data with existing Snowflake customers versus non-Snowflake customers?

Existing Snowflake customers bear the costs of any storage or compute incurred from querying or copying the shared database. For a non-Snowflake customer, the provider would create Reader Accounts and pay for all the costs incurred by those accounts. As the provider, you would be able to track account usage and bill the consumer if that was part of the set business agreement.

How fast would the data update for consumers?

Instant! The data is stored and shared on the cloud so the provider and consumer see the same data. The Secure Share is a metadata wrapper that points to the correct data that is still sitting with the provider. So any changes to the provider’s dataset would be reflected instantly from the consumer’s viewpoint.

Once the consumers can see the data in their account, what can they do with it?

They can query and run any analytics they desire such as Tableau or Sigma. If they wish to manipulate the data, they can copy that data into their own database, so they would have write access as.

Can I allow my users to see only selected tables or views?

Yes! Snowflake has a role-based security framework, so the Account Administrator can limit which roles are accessible to certain users. Roles are a collection of permissions granted on objects. Therefore, what a user can see depends on what permissions have been granted to the user’s role.

What if my consumers go overboard with how much they are using the Reader Account?

As the data provider for Reader Accounts you control usage. Set up Resource Monitors, which impose limits on the number of credits that virtual warehouses use within a specified interval or date range. When these limits are reached or are approaching, the Resource Monitor can trigger an alert and suspension of the warehouse.