


Overview:
This overview describes how to get started using Snowflake. It covers logging into Snowflake through the web interface, command line interface, or other methods. It then provides an overview of the main tabs in the web interface: databases, shares, warehouses, worksheets, and history. The databases tab allows you to manage databases. The warehouse tab allows you to configure computational resources. The worksheet tab allows you to write and run SQL queries. The history tab shows the details of past queries. The overview also describes additional features like the help menu and user preferences.
Snowflake separates its computation engine from storage. This allows it to have the additional advantage of adaptive optimization. This means that Snowflake can automatically scale your cloud usage up or down based on your current needs. In other words, Snowflake saves a little (uses fewer resources) on every data operation, saving you long-term money.
If you’d like to check out Snowflake’s capabilities yourself, you can sign up for a complimentary account with $400 worth of credit here.
Setup Requirements:
- Snowflake Account
- Sign up for free at https://snowflakesolutions.net/ or contact Snowflake directly.
You can connect to Snowflake through:
- A browser (easiest to start) • The command-line interface (CLI) • Programming libraries for your backend stack
I recommend beginning with the browser. Then transition to the CLI or a library, depending on your backend.
- Browser-based web interface
- Minimum Version
- Chrome: 47
- Safari: 9
- Firefox: 45
- Opera: 36
- Edge: 12
- SnowSQL, Snowflake CLI
- Redhat-compatible Linux operating systems
- macOS (64-bit)
- Windows (64-bit)
- Client using JDBC or ODBC
- Linux
- MacOS
- Windows
- 64-bit for JDBC Driver
- 32-bit or 64-bit for ODBC driver
- Any 3rd party partner
Logging into Snowflake:
Account Name
All access to Snowflake is through your account name. You’ll need it to sign in and it’s part of the URL for browser access.
https://account_name.snowflakecomputing.com
The full account name may include the region and the cloud platform hosted by your account. Ex. account-name.us-east-2.aws
Logging into the Web Interface:
Go to the hostname provided by Snowflake for your account. The format should be:
https://account_name.snowflakecomputing.com
You should see the following screen.
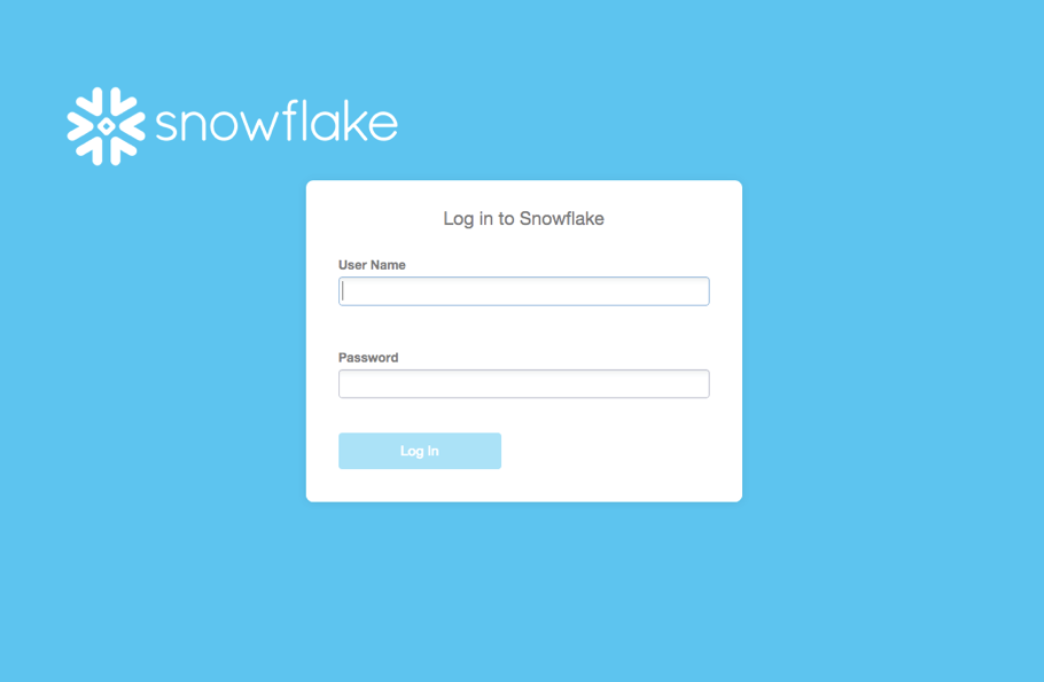
Enter your credentials and Login.
Logging in Using SnowSQL
SnowSQL is the command line client for connecting to Snowflake and executing SQL queries and DDL and DML operations. To connect follow this quick guide.
Logging in Using Other Methods
In addition to the web interface and SnowSQL, Snowflake supports other methods for connecting.
- 3rd-party clients services that support JDBC or ODBC
- Developer applications that connect through drivers for Python, Node.js, Spark, etc.
These methods require additional installation and configuration. Check out this for details.
Web Interface
Snowflake web interface allows you to create/manage virtual warehouses, databases, and data objects. Use this interface to load data into tables, execute ad hoc queries, perform DML/DDL operations, and view past queries. You can also manage administrative tasks such as changing passwords and managing users. Check out Managing Your Snowflake Account for more information.
On the top of the UI, you’ll see the following tabs.

Databases
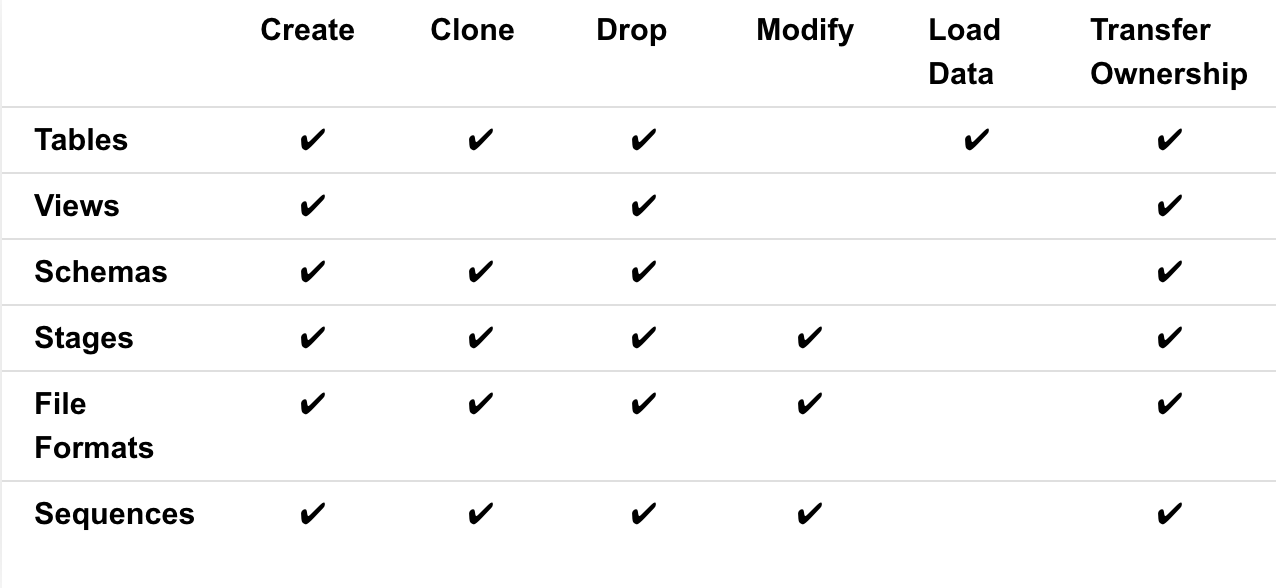
Databases show the databases you have access to. You can create, clone, drop, or transfer ownership of databases.
Tasks you perform on this page include:
- Create, clone, or drop the database
- Transfer ownership of the database
Click the name of a database to view and perform tasks on it:
Shares
Shares show data shared with your organization that you can use and data you are sharing with others.
This is a new page added to Snowflake. It allows you to consume shared data with your organization and provide data to others. Don’t worry about it for now.
Warehouses
Warehouses show the computational resources you can spin up to perform analytics. You can create, drop, suspend, resume, configure, or transfer warehouses.
Warehouses are Snowflake’s computational engines. You will define them by size (computational power) and spin them up to perform data analytics.
This page shows information about the virtual warehouses to create or can access. Tasks you can perform on this page include:
- Create or drop a warehouse
- Suspend or resume a warehouse
- Configure a warehouse
- Transfer ownership of a warehouse
Worksheet
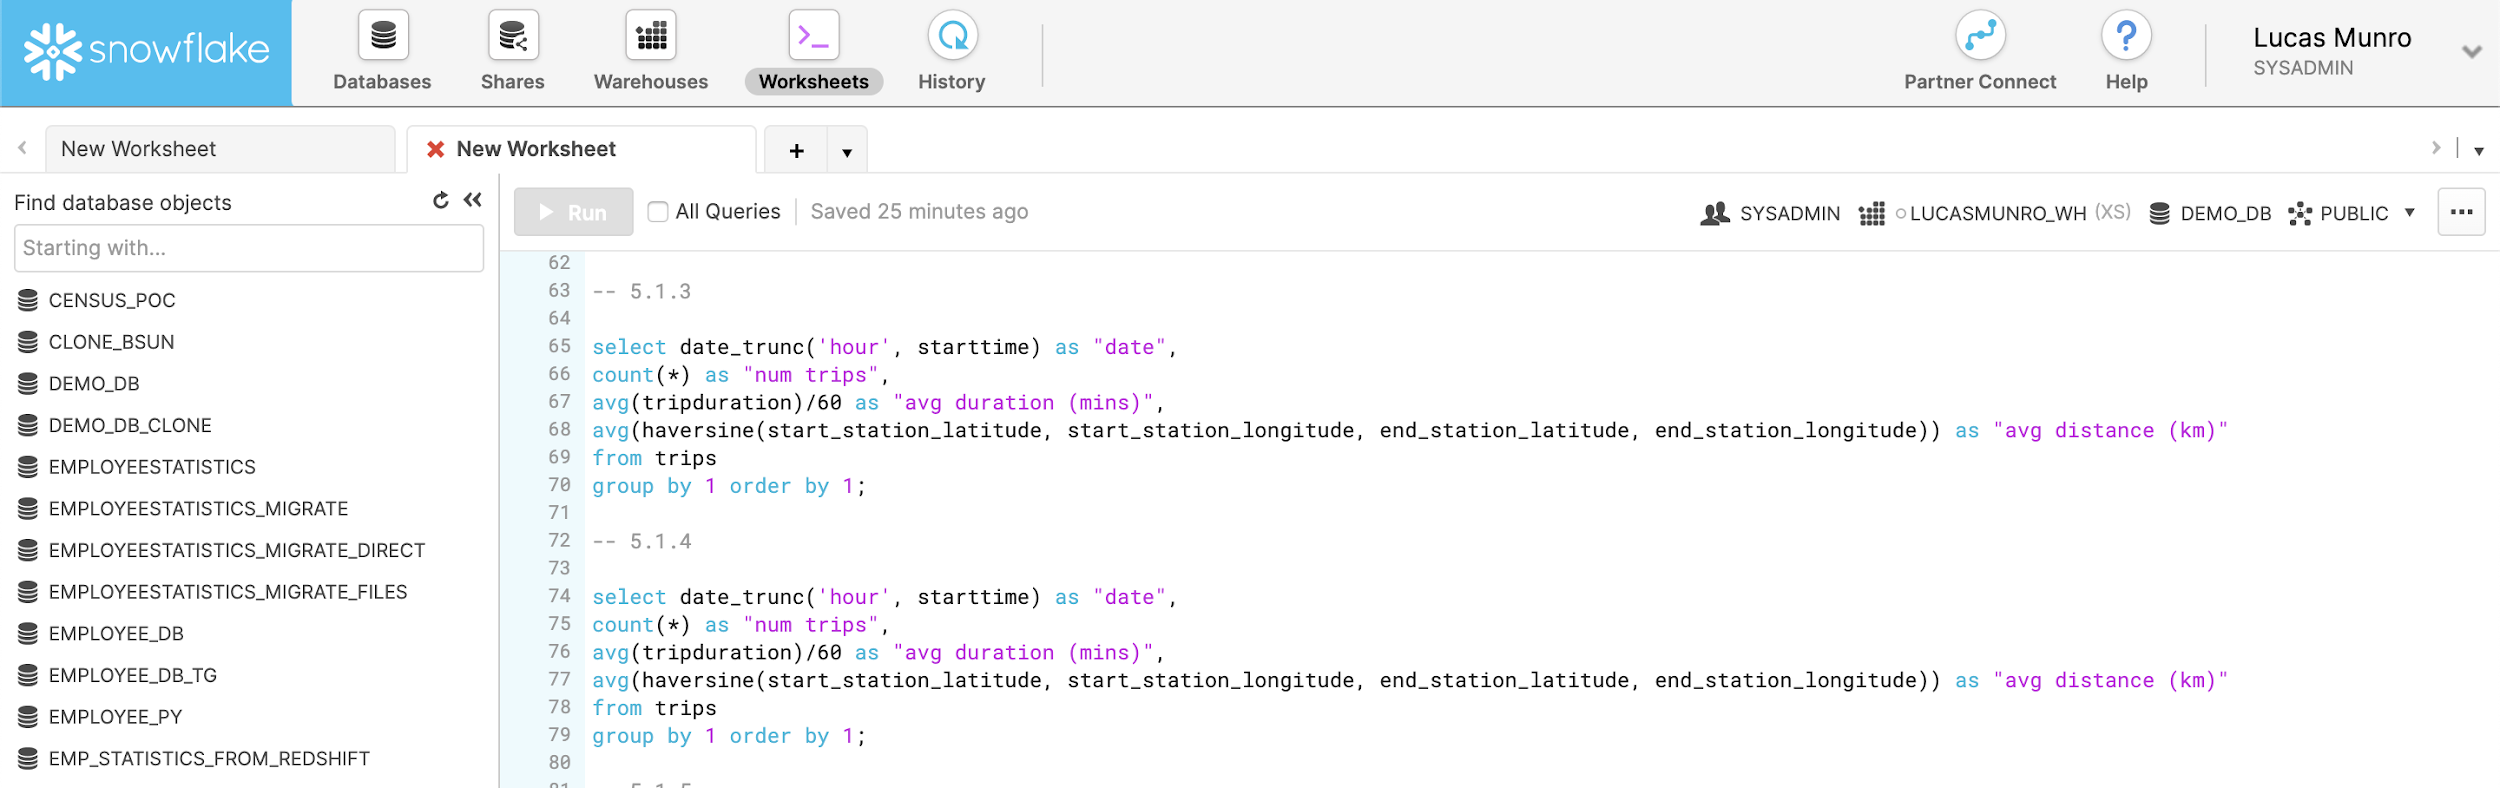
Worksheets are where you can write and run SQL queries and DDL/DML operations. You can run queries, load SQL scripts, open multiple worksheets, save/reopen worksheets, resize warehouses, and export query results.
Tasks you can perform include:
- Run ad hoc queries and other DDL/DML operations in a worksheet, or load SQL script files.
- Open concurrent worksheets, each with its separate session.
- Save and reopen worksheets.
- Log out of Snowflake or switch roles within a worksheet, as well as refresh your browser, without losing your work:
- If you log out of Snowflake, any active queries stop running.
- If you’re in the middle of running queries when you refresh, they will resume running when the refresh is completed.
- Resize the current warehouse to increase or decrease the compute resources utilized for executing your queries and DML statements.
- Export the result for a selected statement (if the result is still available).
For more information, check out Using Worksheets for Queries.
History
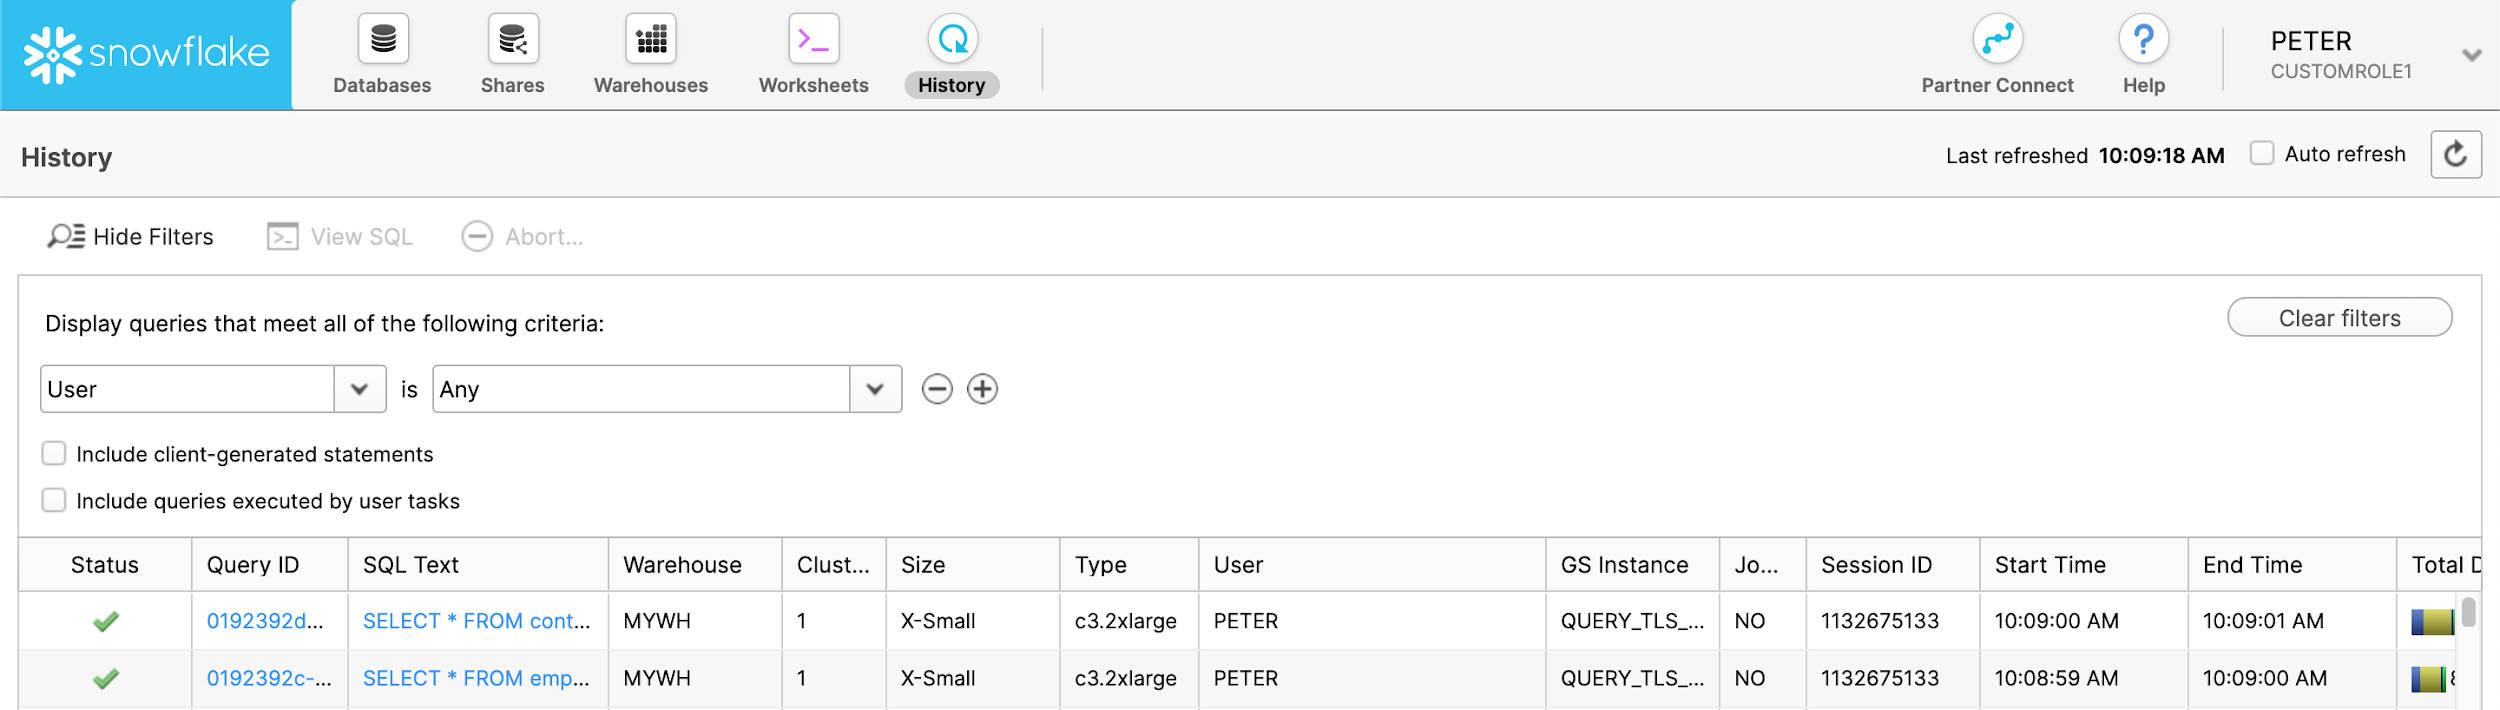
History shows the details of queries run in the last 14 days. You can filter, scroll through, abort ongoing queries, view query details/results (for 24 hours), and change displayed columns.
The page displays a historical listing of queries, including queries executed from SnowSQL or other SQL clients.
Tasks you can perform include:
- Filter queries displayed on the page.
- Scroll through the list of displayed queries. The list includes (up to) 100 queries. At the bottom of the list, if more queries are available, you can continue searching.
- Abort a query that has not been completed yet.
- View the details for a query, including the result of the query. Query results are available for 24 hours. This limit is not adjustable.
- Change the displayed columns, such as status, SQL text, ID, warehouse, and start and end time, by clicking any of the column headers.
Help Menu and User Preferences
On the top right, there is a drop-down menu from the help button. It supports the following actions:
- View the Snowflake Documentation
- Visit the Support Portal
- Download the Snowflake clients by opening a dialog box where you can:
- Download the Snowflake CLI client (SnowSQL) and ODBC driver.
- View download info for the Snowflake JDBC driver, Python components, Node.js driver, and Snowflake Connector for Spark.
- Show the help panel with context-sensitive help for the current page.
To the right of the help button is the user preferences. You can then change your password or security role for the session (if you have multiple roles assigned to you). For more information about security roles and how they influence the objects, you can see them in the interface, and for the tasks, you can perform, see Access Control in Snowflake.
You can also use this dropdown to:
- Set your email address for notifications (if you are an account administrator).
- Close your current session and exit the Snowflake web interface.
Conclusion:
This article summarized how to use Snowflake's web interface to manage a cloud data warehouse. The interface has tabs for databases, data shares, virtual warehouses, SQL worksheets, and query history.
The "Databases" tab lists databases and allows creating, deleting, or cloning them. The "Shares" tab shows data shares controlling database and table access. The "Warehouses" tab manages warehouses required to run queries. Users can start, stop, resize, or unload warehouses. The "Worksheets" tab provides interfaces to run SQL queries and view results. Users can run ad-hoc queries or save common queries. The "Query History" tab lists query details like the user, warehouse, and time. This helps monitor usage, troubleshoot issues, and ensure compliance.
In summary, Snowflake's web interface offers a centralized portal to manage a cloud data warehouse and run SQL queries for business insights.
