Snowflake Data Marketplace Introduction

Introduction:


The Snowflake Data Marketplace is a cloud data exchange platform where organizations can discover, access, and share live, ready-to-query data sets in a secure, governed, and compliant manner.

Long gone are the days when consumers have to copy data, use APIs, or wait days, weeks, and sometimes even months to gain access to datasets. With Snowflake Data Marketplace, analysts around the world are getting the information they need to make important decisions for their businesses in a blink of an eye and the palm of their hands.


What is it and how does it work?


The Snowflake Data Marketplace provides access to live, query-ready data sets. It uses Snowflake's Secure Data Sharing to connect data providers and consumers. Currently, it offers access to 229 data sets. As a consumer, you can discover and access various third-party data sets. They will be directly available in your Snowflake account to query. There's no need to transform the data or spend time joining it with your own data. If you use multiple vendors for data, the Data Marketplace gives you a single source to access everything.


Why is this Marketplace important?


Companies can now securely and instantly share and access live, regulated data in real-time without copying or moving it. In the past, getting access to such data could take days, weeks, months, or even years. With the Data Marketplace, gaining access only takes a couple of minutes. Already over 2000 businesses have requested free access to key data sets in our marketplace. This is a gold mine for anyone who wants data-driven, on-demand access to live and ready-to-query data, and the best part is that it's available globally, across clouds.

There are significant benefits for both providers and consumers. However, three key points enable companies to unlock their true potential using the Data Marketplace:


Source Data Faster and More Easily

  • As we said previously, using Snowflake Data Marketplace as a consumer allows users to avoid the risk and hassle of having to copy and migrate stale data. Instead, securely access live and governed shared data sets, and receive automatic updates in real-time.

Monetize Your Data

  • As a data provider on Snowflake's Data Marketplace, you can create new revenue streams by offering your governed data assets to thousands of potential Snowflake data consumers.


Reduce Analytics Costs

  • Using this service eliminates the costs and effort of traditional data integration. Both consumers and providers can access shared data directly, securely, and compliantly from your Snowflake account. This streamlines data ingestion, pipelines, and transformation.


Learn more about Snowflake Data Marketplace


For more information on Snowflake’s Data Marketplace, visit the official website here.

If you're curious to see Snowflake's official Marketplace demo, check it out here.


Action Items after reading this article:


  • Visit the Snowflake Data Marketplace official website.
  • Check out Snowflake's official Marketplace demo.
  • Learn more about accessing live, query-ready data sets through Snowflake's Data Marketplace.
  • Find, try out, and purchase the data and applications you require to power innovative business solutions.
  • Discover how data providers can create new revenue streams by offering governed data assets.
  • Understand how the Data Marketplace reduces analytics costs by streamlining data ingestion, pipelines, and transformation.

Analyzing PHI & PII with Snowflake’s Data Clean Rooms

Introduction - Data Clean Rooms:


Sharing data can be tough. Organizations struggle to effectively manage their data internally. This problem only increases in magnitude for data sharing across multiple organizations. To make matters worse, regulations on sensitive data (PII and PHI) further complicate the process and this type of analysis is decided to be too troublesome to engage upon.

However, that’s a huge loss of opportunity. Since the business intelligence insights gained from analyzing personal health and sales datasets can be transformative to your business direction and decisions. Luckily, there is now a way to gain access to and analyze this data while abiding by security laws.


Data Clean Room:


A data clean room is a place to perform joint analysis on sensitive data while abiding by regulations. The clean room can be set up by anyone but it will most likely be the provider. A clean room can have multiple data providers. Each provider can control:

  • Incoming Data
  • How their data can be joined with other data
  • Types of analytics that can be performed on their data
  • Outgoing data

This type of data hosting and analysis is made possible by several key Snowflake features: secure data shares, the data marketplace platform,  secure functions, and secure join capabilities.

A consumer in the data clean room can access the provider's data through defined functions, joins, and queries the provider specifies. Data masking (hashing) can provide an extra layer of security so that no naked identifiable data is ever transferred between provider and consumer.


Case Analysis - Advertising to the NBA:


I am the lead marketer for Weight Loss Champions. We sell weight loss pills. We want to launch an advertising campaign targeting NBA All-Stars to use and endorse our product.

Company: Weight Loss Champions

Product: Weight Loss Pills

Marketing Hypothesis: Quarantine has forced a lot of people indoors. Gyms are closed. Many people are drinking and not exercising and have put on weight. We see this as a great opportunity for our business. We also realize that the NBA 2020 Season is set to restart in the Orlando bubble at the end of July.

Objective: Our goal is to get an NBA All-Star to use our weight loss pills. Then try to get them to endorse our product.

Strategy: We have identified several places that these athletes will frequent, such as shopping centers, and restaurants. After doing a little digging, we discovered walkways between these areas that offer ad placements. We must decide what height on these walls to place our ads.


Let’s take a look at how we can accomplish this. The first step is establishing our data clean room.

How to Build Your Own Data Clean Room

The approximate time to create is 8 hours. It took me 2 hours to submit everything to Snowflake and then 6 hours working with them to get the room up. With this guide, I imagine you can do it even faster.

Make a Snowflake Account

Each participant will need a Snowflake account. Existing Snowflake customers can provide a secure sub-account. You can sign up for a 30-day free trial with $400 worth of credit here.

Submit a Support Case 

To submit a support case you will need to create an account on the Snowflake community and link it to your Snowflake account. Once you create your account, follow these instructions to submit a case. Here’s what the case should look like.


Data Clean Rooms 2


After submitting your case, a Snowflake representative will contact you to go through the details and set up the exchange. This could take a couple of hours.


Create a Secure Share

A listing on your private data exchange comes from a secure share. When creating the secure share, you will specify what databases, schemas, and functions. A secure share can be made through the share tab, toggling to the outbound option, and then selecting create.


Data Clean Room 2

Read the full guide to Secure Shares here.


Create a New Listing

Navigate to the Data Marketplace and open your private exchange. On the left side menu, it will be under Data -> Manage. From there you can create a new Listing by clicking the button on the upper right and selecting the Secure Share from before.


Data Clean Room 2


The provider should describe their data set here and provide documentation on how the data can be analyzed. This can be an ongoing process between the provider and the consumer. Where the consumer requests a specific type of analysis and the provider then creates a secure function or share to fulfill that type of analysis.


Configure Roles and Access:


Navigate to the Data Marketplace and click on the Admin tab on the left-hand side. Click on your Private Data Exchange to configure the roles. Here you can add members and specify which accounts can be providers, consumers, and Administrators.


Data Clean Room 3

Analyze your Data:


From here, the consumer can log in to their account. They will be able to access the share and all the available schemas, tables, and functions provisioned by the provider. Here you can take a look at the share I created for a client and the functions made available. We’ll be using them later in the analysis.


Data Clean Room 4

To learn this and other features, feel free to check our blog for more information.

Creating Your First Database

What’s the benefit of learning to create a database on Snowflake?


It is important to learn to create databases with Snowflake because:

  • Snowflake is a popular data warehouse built for the cloud. Having experience with Snowflake will be valuable for data engineers and data scientists.
  • Snowflake has many advantages over traditional data warehouses like fast performance, scalability, and low cost. Being able to build databases on Snowflake will allow you to leverage these benefits.
  • Snowflake uses SQL, a common query language, so the skills you learn will be transferable to other systems.
  • Snowflake has many features for modeling and managing data that you can utilize by knowing how to create databases and schemas.
  • There are many resources and a large community to help you learn Snowflake.


Creating Databases with the User Interface:


To complete this tutorial, you will need a Snowflake account and the URL to log in to the web interface.

Log in to your Snowflake environment and select the Databases tab at the top left of the screen. It should look similar to the image below, except you won't have the same databases. Snowflake provides sample data.


https://snowflakesolutions.net/wp-content/uploads/word-image-23.png


Let’s create a new database. Click the Create button and fill out the information in the pop-up window.


https://snowflakesolutions.net/wp-content/uploads/word-image-24.png


When naming the database, there are restrictions -- no spaces and the name cannot start with a number. You can read the full set of restrictions in Snowflake’s documentation.

Select Finish and you’ll see your new database appear in the table. Click on your database and you’ll see any tables, views, or schemas that exist. Since the database has just been created, none of these objects exists yet.


https://snowflakesolutions.net/wp-content/uploads/word-image-15.jpeg

Creating Schemas:


A snowflake schema is a logical grouping of database objects (tables, views, etc.). Each schema belongs to a single database and can have its security configuration.

From inside our selected database, select the Schemas tab. Snowflake will create a public and information schema by default. The PUBLIC schema can be used to create any other objects. The INFORMATION_SCHEMA contains all the metadata for the database.


https://snowflakesolutions.net/wp-content/uploads/word-image-16.jpeg


Click the Create button and provide and name and comment. The Managed Access option determines if the security of the objects within the schema is managed by the schema owner or the owner of the object.


https://snowflakesolutions.net/wp-content/uploads/word-image-17.jpeg

Creating Databases and Schemas with Code:


All operations done with the UI can also be done with SQL code on the tab of the worksheet. To see what code corresponds to the operations we are doing, click on the Show SQL button.


https://snowflakesolutions.net/wp-content/uploads/word-image-18.jpeg


Using code streamlines our Snowflake work once we understand how it functions. This can reduce time and automate tasks.

To run any SQL code in Snowflake, choose Worksheets from the main menu. This lists all databases on the left for reference and provides a space to enter your code. On the right, we see our current role, database, warehouse, and schema.

Let’s enter the code to replicate the UI process from before. When you click Run, only the line where your cursor is executes. To run multiple lines, highlight them and click Run. If you’ve already created your database, run DROP DATABASE DEMO_DB for this to work.


https://snowflakesolutions.net/wp-content/uploads/word-image-25.png


And with those steps, you should be able to create a database. If you want to learn new techniques, keep checking our blog regularly for more helpful tips.


Conclusion:


To conclude, we have walked through the steps to create your first database and schema in Snowflake using both the user interface and SQL code. You now have the foundation to build tables, load data, and query your Snowflake data warehouse.

Semi Structured JSON Data

Introduction:


In today’s article we’ll go over Snowflake's support for semi-structured data in the form of JSON, Avro, ORC, Parquet, and XML. It covers the process of loading JSON data into a Snowflake table, including creating a database object, schema, table, file format, and stage. It also provides an example of querying semi-structured data using Snowflake's SQL SELECT statements.


What is Snowflake’s semi-structured data?


One of Snowflake's unique feature is its native support for semi-structured data. Snowflake supports semi-structured data in the form of JSON, Avro, ORC, Parquet, and XML. Semi-structured data is data that does not conform to a specific schema, such as JSON data. Snowflake can load JSON data directly into table columns with type VARIANT, a universal type that can be used to store values of any type. Data can be queried using SQL SELECT statements that reference JSON elements by their paths.

One of Snowflake’s unique features is its native support for semi-structured data. Snowflake supports semi-structured data in the form of JSON, Avro, ORC, Parquet, and XML. JSON is the most widely used and industry standard due to its data format and ease of use.


JSON data can be loaded directly into the table columns with type VARIANT, a universal type that can be used to store values of any type. Data can be queried using SQL SELECT statements that reference JSON elements by their paths.

Let’s take a look at our JSON data. Here our some JSON data properties:

  • Data in JSON is a name-value pair.
  • Data is separated by a comma.
  • Curly braces hold objects.
  • Square brackets hold an array.
{
"ID": 1,
"color": "black",
"category": "hue",
"type": "primary",
"code": {
"rgb": "255,255,255",
"hex": "#000"
}
},{
"ID": 2,
"color": "white",
"category": "value",
"code": {
"rgb": "0,0,0",
"hex": "#FFF"
}
},{
"ID": 3,
"color": "red",
"category": "hue",
"type": "primary",
"code": {
"rgb": "255,0,0",
"hex": "#FF0"
}
}

Database Object

We have created a new database object to load and process semi-structured data as shown below. You can use the existing one if you have already created it earlier.

CREATE DATABASE IF NOT EXISTS TEST_DATABASE;


Schema

Create a new schema under TEST_DATABASE object to have ease of access. This step is optional if you already have access to the existing schema. In such a case you can use the existing schema.

CREATE DATABASE IF NOT EXISTS TEST_DATABASE;

Table

In order to create JSON data, we need an object to hold the data and it should be capable enough to hold the semi-structured data.

In snowflake, to process the semi-structured data, we have the following data types:

  • Variant
  • Array
  • Object

We’ll be using the variant object to load data into a Snowflake table.

CREATE TABLE IF NOT EXISTS COLORS
(
TEST_DATA VARIANT
);

Object CHRISTMAS_REC is created with one column TEST_DATA that holds the object of JSON data.


File Format

To load the JSON object into a Snowflake table, file format is one of the mandatory objects in snowflake:

CREATE FILE FORMAT JSON_FILE_FORMAT
TYPE = 'JSON'
COMPRESSION = 'AUTO'
ENABLE_OCTAL = FALSE
ALLOW_DUPLICATE = FALSE
STRIP_OUTER_ARRAY = TRUE
STRIP_NULL_VALUES = FALSE   IGNORE_UTF8_ERRORS = FALSE;

The above file format is specific to JSON. The STRIP_OUTER_ARRAY array option removes the outer set of square brackets [ ] when loading the data, separating the initial array into multiple lines. If we did not strip the outer array, our entire dataset would be loaded into a single row in the destination table.


Stage

In order to copy the data to a Snowflake table, we need data files in the cloud environment. Snowflake provides two types of stages:

  • Snowflake Internal stage.
  • External stages (AWS, Azure, GCP).

If you do not have any cloud platform, Snowflake provides space to store data into its cloud environment called – “Snowflake Internal stage”.

In this article, we have used a Snowflake internal stage and created a dedicated stage for semi-structured load.

CREATE STAGE IF NOT EXISTS JSON_STAGE FILE_FORMAT = JSON_FILE_FORMAT;

You can use below command to list files in stages:

LIST @JSON_STAGE;

PUT & COPY Command


PUT command fetches data from local storage to snowflake internal stages. You can run this command from the Snowflake CLI client. I’ll be using the Snowflake UI to do it under the database tab.

PUT file://<file_path>/sample.json @COLORS/ui1591821970011   COPY INTO "TEST_DATABASE"."TEST_SCHEMA"."COLORS" FROM @/ui1591821970011 FILE_FORMAT = '"TEST_DATABASE"."TEST_SCHEMA"."JSON_FILE_FORMAT"' ON_ERROR = 'ABORT_STATEMENT';

You can accomplish the same thing by using Snowflake UI under the database tab. Click on your database and then find your way to the table. Click on load data above it.


https://snowflakesolutions.net/wp-content/uploads/word-image-18.png


Check that the data was properly loaded (SELECT from COLORS).

https://snowflakesolutions.net/wp-content/uploads/word-image-19.png


Querying Semi-Structured Data

Snowflake is extremely powerful when it comes to querying semi-structured data. The command works a lot like JavaScript, except we use : notation to retrieve the category for each row. By using :: notation, we define the end data type of the values being retrieved.

SELECT
test_data:ID::INTEGER as ID,
test_data:color::STRING as color,
test_data:category::STRING as category,
test_data:type::STRING as type,
test_data:code.rgb::STRING as code_rgb,
test_data:code.hex::STRING as code_hex
FROM
colors;

https://snowflakesolutions.net/wp-content/uploads/word-image-20.png


Conclusion:


The process of loading data into a database can be a cumbersome task but with Snowflake, this can be done easily. Snowflake functionality makes it possible to process semi-structured data. Check out the docs to learn more about semi-structured data.

Snowflake Stored Procedures

Part 1 - Introduction


Today’s article provides an introduction to stored procedures in Snowflake, which can be used to create modular code with complex business logic by combining SQL statements with procedural logic. The article discusses the benefits of stored procedures, including error handling and dynamically creating SQL statements, and provides examples of how to create and use stored procedures in Snowflake.


Part 2 - What are Snowflake Stored Procedures?


Snowflake stored procedures can be thought of as a function that enables users to create modular code with complex business logic by combining multiple SQL statements with procedural logic. They are used for data migration and validation while handling exceptions. Benefits of stored procedures include procedural logic such as branching and looping, error handling, dynamically creating SQL statements to execute, and executing code with the privileges of the stored procedure creator. A Stored Procedure is created with a CREATE PROCEDURE command and is executed with a CALL command. A Stored Procedure uses JavaScript for logic and control and SQL is used to call the JavaScript API.


Part 3 - Benefits of Stored Procedures include:


  • Procedural logic such as branching and looping which straight SQL does not support.
  • Error handling.
  • Dynamically creating SQL statements to execute.
  • Executing code with the privileges of the stored procedures creator. This allows stored procedure owners to delegate power to perform operations to users who otherwise could not.

A Stored Procedure is created with a CREATE PROCEDURE command and is executed with a CALL command. The result is returned as a single value. A Stored Procedure uses JavaScript for logic and control and SQL is used to call the JavaScript API.


Part 4 - Stored Procedure Examples:


Let’s say we want to insert a row using a stored procedure.

First, let’s create a database and table to use.

USE DATABASE DEMO_DB;
CREATE OR REPLACE TABLE Employee(emp_id INT, emp_name varchar,emp_address varchar);
create sequence if not exists emp_id;

Now that we have that setup, let’s create our first stored procedure.

CREATE OR REPLACE PROCEDURE employee_insert(name varchar, address varchar)
RETURNS VARCHAR
LANGUAGE JAVASCRIPT
AS
$$
var command = "INSERT INTO Employee (emp_id, emp_name, emp_address) VALUES (emp_id.nextval, '"+NAME+"','"+ADDRESS+"')";
var cmd_dict = {sqlText: command};
var stmt = snowflake.createStatement(cmd_dict);
var rs = stmt.execute();
return 'success';
$$;

In the first section, we define the SPs name, parameters, return value, and language. Then between the $$, we write the actual code. Now that everything is setup, we can use the SP with the CALL command like this:

CALL employee_insert('Name','Location');

Let’s give this a try and see what happens!

https://snowflakesolutions.net/wp-content/uploads/word-image-17.png


Awesome! That worked!

Make sure to use a database that exists in your console if you’re replicating this.

However, a simple insert isn’t particularly useful for a Stored Procedure. We’d be better off just using pure SQL. Let’s look at a more realistic example that better demonstrates the power of Stored Procedures.


Taking it Further


Let’s imagine the following scenario. You receive an employee’s data in JSON. You want to store it on the table but you have to ensure the following first:

  • Employee name cannot be empty or NULL
  • Employee name must be unique
  • Employee address cannot be NULL

It is possible to do all of this using a single stored procedure. However, since we have two distinct tasks — validation and insert — it’s better practice to break them up into 2 separate procedures. We’ll then call the validation procedure from inside the insert procedure. We’ll be utilizing Snowflake’s variant type to return a json object. Let’s take a look at our validate procedure.


Validate Procedure


create or replace procedure employee_validate_json(INPUT VARCHAR)
RETURNS VARIANT NOT NULL
LANGUAGE JAVASCRIPT
AS
$$
var json_row = {};
var error_count = 0;
try {
    var employee_data = JSON.parse(INPUT);
    var employee_id = employee_data.employee_id;
    var employee_name = employee_data.employee_name;
    var employee_address = employee_data.employee_address;
    if (!employee_name) {
        json_row["employee_name"] = "employee name cannot be empty or null.";
        error_count = 1;
    } else {
        var command = "select count(*) from Employee where emp_name='"+ employee_name + "'";
        var stmt = snowflake.createStatement({sqlText: command});
        var res = stmt.execute();
        res.next();
        row_count = res.getColumnValue(1);
// check for duplicate
    if (row_count > 0) {
        json_row["employee_name"] = "employee name already exists in table.";
        error_count = 1;
    }
}
if (employee_address == null || employee_address == undefined) {
    json_row["employee_address"] = "employee address should not be NULL.";
    error_count = 1;
}
json_row["is_error"] = error_count;
} catch (err) {
    json_row["Exception"] = "Exception: " + err;
    json_row["is_error"] = 1;
}
return json_row;
$$;

The stored procedure will either return is_error = 0 if there is nothing wrong with our JSON or return is_error = 1 with the appropriate error message.

Successful run:

call EMPLOYEE_VALIDATE_JSON('{
"employee_name": "Lucas", "employee_address": "Los Angeles"
}');

Result:
{ "is_error": 0 }

Error run:

call EMPLOYEE_VALIDATE_JSON('{
"employee_name": "", "employee_address": "Los Angeles"
}');

Result:
{"employee_name": "employee name cannot be empty or null.", "is_error": 1 }

Now that we have our validation working. Let’s dive into our insert procedure!


Insert Procedure


Our insert procedure is going to call our validate procedure and check for any errors. If it finds any, it will return them. If not, it will attempt to insert the data into the table. Also returning a json upon completion.

create or replace procedure employee_insert_json(INPUT VARCHAR)
RETURNS VARIANT NOT NULL
LANGUAGE JAVASCRIPT
AS
$$
var json_row = {};
var message = {};
var detail = {};
var result = '';
var error_count = 0;
try {
    var employee_data = JSON.parse(INPUT);
    var employee_name = employee_data.employee_name;
    var employee_address = employee_data.employee_address;
    var command_validate = "call employee_validate_json('" + INPUT + "')";
    var cmd_dict_validate = {sqlText: command_validate};
    var stmt_validate = snowflake.createStatement(cmd_dict_validate);
    var rs_validate = stmt_validate.execute();
    rs_validate.next();
    var validate_result = rs_validate.getColumnValue(1);
if (validate_result.is_error > 0) {
    return validate_result;
} else {
    var command = "INSERT INTO employee(emp_id,emp_name,emp_address) VALUES(emp_id.nextval, '" + employee_name + "','" + employee_address + "')";
    var cmd_dict = {sqlText: command};
    var stmt = snowflake.createStatement(cmd_dict);
    var rs = stmt.execute();
    json_row["message"] = "successfully inserted employee";
}
} catch (err) {
    json_row["exception"] = err;
    error_count = 1;
}
json_row["is_error"] = error_count;
return json_row;
$$;

Let’s take a look at some sample runs.

call EMPLOYEE_INSERT_JSON('{
"employee_name": "Lucas", "employee_address": "Los Angeles"
}');

Result:
{ "is_error": 0, "message": "successfully inserted employee" }

Nice! That worked but let’s see what happens if we try to run the same command again.

call EMPLOYEE_INSERT_JSON('{
"employee_name": "Lucas", "employee_address": "Los Angeles"
}');

Result:
{"employee_name": "employee name already exists in table.", "is_error": 1 }

When we try it again our validate procedure finds that the employee name already exists!


Part 5 - Try Snoptimizer today!


Snoptimizer quickly and automatically optimizes your Snowflake account for security, cost, and performance. It eliminates headaches and concerns about security risks and cost overruns across your Snowflake account.

Try Snoptimizer today. Sign up and schedule a personal demo with us!


Part 6 - Conclusion:


Stored procedures are a great way to streamline your Snowflake tasks. They can also be used to grant higher-level access to lower-level users in a defined manner. I hope this tutorial has helped you create or transfer your stored procedures to Snowflake.

If you're interested in trying out Snoptimizer, feel free to schedule a personal demo with us today.

Getting Started with Snowflake

Overview:


This overview describes how to get started using Snowflake. It covers logging into Snowflake through the web interface, command line interface, or other methods. It then provides an overview of the main tabs in the web interface: databases, shares, warehouses, worksheets, and history. The databases tab allows you to manage databases. The warehouse tab allows you to configure computational resources. The worksheet tab allows you to write and run SQL queries. The history tab shows the details of past queries. The overview also describes additional features like the help menu and user preferences.

Snowflake separates its computation engine from storage. This allows it to have the additional advantage of adaptive optimization. This means that Snowflake can automatically scale your cloud usage up or down based on your current needs. In other words, Snowflake saves a little (uses fewer resources) on every data operation, saving you long-term money.

If you’d like to check out Snowflake’s capabilities yourself, you can sign up for a complimentary account with $400 worth of credit here.


Setup Requirements:


  • Snowflake Account

    You can connect to Snowflake through:

    • A browser (easiest to start) • The command-line interface (CLI) • Programming libraries for your backend stack

    I recommend beginning with the browser. Then transition to the CLI or a library, depending on your backend.

  • Browser-based web interface
    • Minimum Version
    • Chrome: 47
    • Safari: 9
    • Firefox: 45
    • Opera: 36
    • Edge: 12
  • SnowSQL, Snowflake CLI
    • Redhat-compatible Linux operating systems
    • macOS (64-bit)
    • Windows (64-bit)
  • Client using JDBC or ODBC
    • Linux
    • MacOS
    • Windows
      • 64-bit for JDBC Driver
      • 32-bit or 64-bit for ODBC driver
  • Any 3rd party partner


Logging into Snowflake:


Account Name

All access to Snowflake is through your account name. You’ll need it to sign in and it’s part of the URL for browser access.

https://account_name.snowflakecomputing.com

The full account name may include the region and the cloud platform hosted by your account. Ex. account-name.us-east-2.aws


Logging into the Web Interface:


Go to the hostname provided by Snowflake for your account. The format should be:

https://account_name.snowflakecomputing.com

You should see the following screen.


https://snowflakesolutions.net/wp-content/uploads/word-image-3.png


Enter your credentials and Login.


Logging in Using SnowSQL


SnowSQL is the command line client for connecting to Snowflake and executing SQL queries and DDL and DML operations. To connect follow this quick guide.


Logging in Using Other Methods


In addition to the web interface and SnowSQL, Snowflake supports other methods for connecting.

  • 3rd-party clients services that support JDBC or ODBC
  • Developer applications that connect through drivers for Python, Node.js, Spark, etc.

These methods require additional installation and configuration. Check out this for details.


Web Interface


Snowflake web interface allows you to create/manage virtual warehouses, databases, and data objects. Use this interface to load data into tables, execute ad hoc queries, perform DML/DDL operations, and view past queries. You can also manage administrative tasks such as changing passwords and managing users. Check out Managing Your Snowflake Account for more information.

On the top of the UI, you’ll see the following tabs.


https://snowflakesolutions.net/wp-content/uploads/word-image-4.png

Databases


Databases show the databases you have access to. You can create, clone, drop, or transfer ownership of databases.

Tasks you perform on this page include:

  • Create, clone, or drop the database
  • Transfer ownership of the database

Click the name of a database to view and perform tasks on it:


https://snowflakesolutions.net/wp-content/uploads/word-image-5.png

Shares


Shares show data shared with your organization that you can use and data you are sharing with others.

This is a new page added to Snowflake. It allows you to consume shared data with your organization and provide data to others. Don’t worry about it for now.


Warehouses


Warehouses show the computational resources you can spin up to perform analytics. You can create, drop, suspend, resume, configure, or transfer warehouses.

Warehouses are Snowflake’s computational engines. You will define them by size (computational power) and spin them up to perform data analytics.

This page shows information about the virtual warehouses to create or can access. Tasks you can perform on this page include:

  • Create or drop a warehouse
  • Suspend or resume a warehouse
  • Configure a warehouse
  • Transfer ownership of a warehouse


Worksheet


https://snowflakesolutions.net/wp-content/uploads/word-image-6.png


Worksheets are where you can write and run SQL queries and DDL/DML operations. You can run queries, load SQL scripts, open multiple worksheets, save/reopen worksheets, resize warehouses, and export query results.


Tasks you can perform include:

  • Run ad hoc queries and other DDL/DML operations in a worksheet, or load SQL script files.
  • Open concurrent worksheets, each with its separate session.
  • Save and reopen worksheets.
  • Log out of Snowflake or switch roles within a worksheet, as well as refresh your browser, without losing your work:
    • If you log out of Snowflake, any active queries stop running.
    • If you’re in the middle of running queries when you refresh, they will resume running when the refresh is completed.
  • Resize the current warehouse to increase or decrease the compute resources utilized for executing your queries and DML statements.
  • Export the result for a selected statement (if the result is still available).

For more information, check out Using Worksheets for Queries.


History


https://snowflakesolutions.net/wp-content/uploads/history-page-in-the-snowflake-web-interface.png

History shows the details of queries run in the last 14 days. You can filter, scroll through, abort ongoing queries, view query details/results (for 24 hours), and change displayed columns.

The page displays a historical listing of queries, including queries executed from SnowSQL or other SQL clients.

Tasks you can perform include:

  • Filter queries displayed on the page.
  • Scroll through the list of displayed queries. The list includes (up to) 100 queries. At the bottom of the list, if more queries are available, you can continue searching.
  • Abort a query that has not been completed yet.
  • View the details for a query, including the result of the query. Query results are available for 24 hours. This limit is not adjustable.
  • Change the displayed columns, such as status, SQL text, ID, warehouse, and start and end time, by clicking any of the column headers.


Help Menu and User Preferences


On the top right, there is a drop-down menu from the help button. It supports the following actions:

  • View the Snowflake Documentation
  • Visit the Support Portal
  • Download the Snowflake clients by opening a dialog box where you can:
    • Download the Snowflake CLI client (SnowSQL) and ODBC driver.
    • View download info for the Snowflake JDBC driver, Python components, Node.js driver, and Snowflake Connector for Spark.
  • Show the help panel with context-sensitive help for the current page.

To the right of the help button is the user preferences. You can then change your password or security role for the session (if you have multiple roles assigned to you). For more information about security roles and how they influence the objects, you can see them in the interface, and for the tasks, you can perform, see Access Control in Snowflake.

You can also use this dropdown to:

  • Set your email address for notifications (if you are an account administrator).
  • Close your current session and exit the Snowflake web interface.


Conclusion:


This article summarized how to use Snowflake's web interface to manage a cloud data warehouse. The interface has tabs for databases, data shares, virtual warehouses, SQL worksheets, and query history.

The "Databases" tab lists databases and allows creating, deleting, or cloning them. The "Shares" tab shows data shares controlling database and table access. The "Warehouses" tab manages warehouses required to run queries. Users can start, stop, resize, or unload warehouses. The "Worksheets" tab provides interfaces to run SQL queries and view results. Users can run ad-hoc queries or save common queries. The "Query History" tab lists query details like the user, warehouse, and time. This helps monitor usage, troubleshoot issues, and ensure compliance.

In summary, Snowflake's web interface offers a centralized portal to manage a cloud data warehouse and run SQL queries for business insights.

SnowSQL CLI Client

Introduction - Snowsql CLI Client


SnowSQL is a command-line client for Snowflake, a cloud-based data warehousing and analytics platform. It allows you to execute SQL queries and perform all DDL and DML operations. It can be downloaded from the Snowflake Repository and has all the same capabilities as the Snowflake UI. It provides an easy way to access Snowflake right from your command line.


In this article we'll discuss how to install and configure SnowSQL.


Steps to Activate SnowSQL CLI Client:


Step 1 – Download and Install SnowSQL CLI


1. Login into Snowflake and click on Help in the top right corner

2. Click on Downloads -> Snowflake Repository

3. Select Cli Client (snowsql) and click Snowflake Repository in the Downloads Dialog box.

https://snowflakesolutions.net/wp-content/uploads/word-image-12.png


This will lead you to a web index page.

4. Select the operating system where you want to install SnowSQL and click download.

https://snowflakesolutions.net/wp-content/uploads/word-image-13.png

5. Click on bootstrap -> 1.2 (or the newest version) -> Pick your OS (Darwin is Mac) -> Download the latest version

6. Run the installer.


Step 2 – Running SnowSQL CLI


2.1. Check SnowSQL is installed properly

Run: snowsql -v

Output: Version: 1.2.5 (or latest)

Good! Now that snowsql has been installed, let’s set up our environment to work.


2.3 Login to your account

snowsql -a account_name -u username

Account name can be found in the first part of your URL when logged into Snowflake (everything before snowflakecoputing.com, for instance, sample_username.sample_region.azure)


https://snowflakesolutions.net/wp-content/uploads/word-image-14.png

Setup the database context


// create a warehouse

CREATE WAREHOUSE yourname_WH AUTO_SUSPEND = 60 AUTO_RESUME=TRUE;

USE WAREHOUSE yourname_WH;

// select your desired database

USE DATABASE SNOWFLAKE_SAMPLE_DATA;

// select the data schema

USE SCHEMA TPCDS_SF100TCL;


https://snowflakesolutions.net/wp-content/uploads/word-image-15.png


(Note: Lukes-MacBook-Pro and lmunro are specific to my console. Yours will be different unless you somehow stole my laptop in which case please give it back.)

Awesome! Now we’re ready to perform whatever data analytics you desire.

However, it can be quite tedious to type in your account, username, password, warehouse, DB, and schema every time you log in. You can edit the snowSQL config file to perform these automatically.


Step 3 – Edit Config File


3.1 Locate the hidden snowsql folder

    • Linux/Mac OS: ~/.snowsql/
    • Windows: your-user-folder.snowsql


3.2 Open the file named config and add the following

[connections.configuration-name]

accountname = your_account_name

username = your_username

password = your_password

dbname = SNOWFLAKE_SAMPLE_DATA

warehousename = yourname_WH

schemaname = TPCDS_SF100TCL

  • Save and exit
  • Connect using the following command

snowsql -c configuration-name


https://snowflakesolutions.net/wp-content/uploads/word-image-16.png

Step 4 – Modify Display Prompt


SnowSQl prompt automatically displays the current user, warehouse, database, and schema. The tokens can be seen in the image above. This prompt can be a bit lengthy but you can edit the prompt with the following command:

!set prompt_format=>>

To auto-change the prompt format, add the following to the configuration file.

[options]

auto_completion gives you possible existing options, very helpful!

auto_completion = True

prompt_format=>>


Q&A’s Section:


1. What does the -c mean?


Whenever you run a program in the terminal you can specify arguments with a dash (-). The -c parameter tells the program snowsql to look in ~/.snowsql/config for a connection named lmunro_config. It then uses those credentials and other configurations to quickly log you in and set up your environment. Note: -c is an abbreviation. You can also use –connection.


2. Are there any other parameters that I should know about?


Yes! There are a bunch of parameters that can make your life easier. You can log in and set up your environment all in one line, like this:

snowsql -a **.east-us-2.azure -u lmunro -d SNOWFLAKE_SAMPLE_DATA -s TPCDS_SF100TCL -w LUCASMUNRO_WH

Don’t worry if that’s a bit overwhelming. You can (and should) use the config file so you don’t need to type it all out. If you’re interested in using these parameters or want more information check out the docs.


3. What is the config file?

The config file is a file that can be edited to set configuration and options for the SnowSQL CLI. It allows you to preset login credentials and database settings by adding a [connections] block and specify options by adding to the [options] block. For more information, you can check out the public documentation at https://docs.snowflake.com/en/user-guide/snowsql-config.html.


Conclusion


SnowSQL CLI is a quick way to plug into Snowflake directly from the terminal. It’s preferable to the UI if you already have a grasp of terminal operations and don’t require the UI to navigate around.

The config file in the SnowSQL folder is where you can set configuration and options for the CLI. You can preset login credentials and database settings by adding a [connections] block and specify options by adding to the [options] block. For more information check out the public documentation.

Snowflake and Python

Introduction

Python has become one of the go to languages for data analytics. I’m constantly using jupyter notebooks to quickly clean, analyze, and visualize data. That’s why I was ecstatic to learn that my favorite data warehouse, Snowflake, has a simple python connector. In fact, it took me just 10 minutes to set up my environment and start running analytics on some COVID-19 data!

Allow me to walk you through it.

Overview

The Snowflake Connector for Python provides an interface to develop Python applications which connect to Snowflake. The connector supports all standard operations.

Prerequisites

If you don’t have python yet, install it here.

This tutorial requires a minimum of Python 2.7.9 or Python 3.5.0, any version above that is supported. To check what version of Python you have installed on your machine, open terminal and run the following command:

python --version

If your python version is out of date, run this command to update:

python -m pip install --upgrade pip

Install Python Connector for Snowflake

Snowflake’s Python Connector is part of the Python Package Index (PyPI) so we can install it with pip or conda.

pip install --upgrade snowflake-connector-python
#Or (if your using python 3)
pip3 install --upgrade snowflake-connector-python
#Or (if you prefer conda)
conda install -c conda-forge snowflake-connector-python

Connecting to Snowflake with Python

Now that the connector is installed, let’s connect to Snowflake. I’m using jupyter notebooks but you can use any Python IDE for this. To begin, let’s import the Snowflake package we just downloaded.

import snowflake.connector

Now that we’ve imported the library, we’ll need 2 key pieces of information to connect to snowflake.

  • Snowflake account and region
  • User login and password

The snowflake account and region can be found in the URL when you log into Snowflake website. For example:

http://demo-account.demo-region.snowflakecomputing.com

The format is https://ACCOUNT.ACCOUNT_REGION.snowflakecomputing.com. So our account would be demo-account.demo-region. Your user information is the same you use to login to snowflake. We can create some variables to store this information.

sfAccount = ‘demo-account.demo-region’

sfUser = ‘demo-user’

sfPassword = ‘demo-pass’

Now we have all the information needed to use the Python connector in our application. The following example attempts to establish a connection and print out the version of snowflake we have running. If the connection fails, an error message is printed out.

import snowflake.connector

sfAccount = 'demo-account.demo-region'
sfUser = 'demo-user'
sfPass = 'demo-pass'
// Connection object holds the connection and session information with the database alive
conn = snowflake.connector.connect(
user = sfUser,
password = sfPass,
account = sfAccount
)
// creates a cursor object to for execute and fetch operations
cs = conn.cursor()

try:
cs.execute("SELECT current_version()")
one_row = cs.fetchone()
print(one_row[0])
finally:
cs.close()
conn.close()

There you go! We’ve just connected to our snowflake database with python and retrieved some information. This should serve as a starting point for you to build your application. To dive deeper into what snowflake operations you can do with python check out the official documentation.

Secure Data Sharing with Snowflake

Introduction

Big Data. Internet of Things. Social Media. Everyday millions of data points are generated and moved across the internet, from the viral video you send to your friend on TikTok to critical business data to make decisions. The acceleration of data use and utility is only getting faster. That’s why security and protecting your data is of the utmost importance. That's where Secure Data Sharing comes in play.

The cloud is the solution. Snowflake’s platform offers instant access to live data in a secure format. This feature can not only streamline data sharing inside organizations but also how we share data to the outside. Many companies continue to use outdated data sharing technologies which are more costly and less secure.

How Does Secure Data Sharing Work?

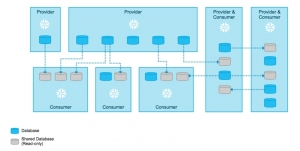
Sharing involves two parties: the data provider and one or more consumers. Snowflake enables sharing of database tables, views and user-defined functions (UDFs) using a Secure Share object. A data consumer given a Secure Share has access to a read-only version of the database in their own account to operate on.

With Snowflake’s data sharing, no actual data is copied or transferred between accounts. All sharing is accomplished through the service layer and metadata store. Thanks to Snowflake’s architecture and separate compute from storage, data sharing is instant and prevents storage costs.

Sharing is done with a Secure Share object. Each Secure Share includes: privileges that grant access to the database, schema, consumer accounts and objects being shared (tables, views, UDFS). The share object represents a connection between the provider and consumer. New objects or data can be added to the object and will be available to the consumer in real time. Access to a share can be revoked at any time as well.

Two Types of Consumers

Participates in Secure Data Sharing are either data provider or consumer. A provider creates a Secure Share to export, and the consumer imports the Secure Share. However, there are two different types of consumers: reader accounts and full consumer. The difference affects who pays for the storage resources.

Full consumer accounts are existing Snowflake customers. Data can be shared directly to the existing account and the existing account pays for all computer resources incurred by querying the database.

Reader accounts are from consumers not on Snowflake’s platform. If the consumer is not a Snowflake customer, the provider can create Reader Accounts. For a Reader Account, all costs would be paid by the provider who shared the data. All costs can be tracked and invoiced back to the consumer.

Setting up a Secure Share with Reader Account

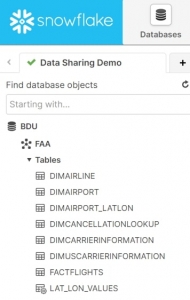
Let’s begin with an example using my personal database (BDU), which has a schema containing flight data (FAA). There are eight tables in the schema:

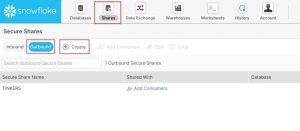
Click the Shares tab at the top of the user console, making sure that you toggle the view to Outbound since you are a provider creating a Secure Share that will go to an outside account. Then hit the Create button to open the menu to create a Secure Share. Please note that you need ACCOUNTADMIN privileges, or a custom role that has been granted these specific privileges, to create a Secure Share. SYSADMIN privileges will not be enough:

In the menu, insert the Secure Share Name (SHAREDEMO), and click the button to Select Tables & Secure Views to select the eight tables. Please note that you can select or deselect tables or views as needed. Next, hit the Create button to complete the process:

Now you see that Secure Share has been created and the data can be previewed. Please note that you need an available Virtual Warehouse that is usable by your current role in order to run this query. Next, click the button to Add Consumers:

As you can see, there are two Account Types: Reader and Full. Full is an existing user which will assume costs. Reader does not, the data provider pays for them. In this case, the intended consumer is not a Snowflake customer, so click the Create a Reader account link:

To create a Reader Account, insert the name (READERACCOUNT) and a comment (optional), along with credentials for the ACCOUNTADMIN user (READER1). Then click Create Account:

Going back to a worksheet and executing the command SHOW MANAGED ACCOUNTS will show all details needed:

Going back to the previous Add Consumers menu, you can now see that the new Reader Account has been added as a Consumer of the Secure Share. Clicking the blue link with the account locator (XB28199) will also take you the login for the Reader Account:

Enter the credentials for the ACCOUNTADMIN user:

Once you are in your Reader Account, you will need to do some setup. First, ensure that your role is ACCOUNTADMIN (it will default to SYSADMIN). Then click the Warehouses tab and create a warehouse to use (DEMO_WH). You will need compute resources to run queries from your provider.

Click the Shares account, making sure that you are toggled to Inbound. We see the SHAREDEMO has been shared to us by the ITSTRATEGISTS account we were using, which is the data provider in this case. Click Create Database From Secure Share:

In the menu, name your database accordingly and grant access to the desired roles. You can change the name of the database given by the provider. You can grant access to the database to multiple roles. Click Create Database:

Navigate to Worksheets. The shared database (SHARE_FAA) now has read-only tables you can query using the SYSADMIN role. As the consumer, you should be able to read from it using a reporting tool like Tableau or an ETL tool. If you’re a Full Consumer, you can query this data along with your existing data while not paying any storage costs.

Database tables are read-only. To change this, you can create another database and table by selecting from the shared tables. In this case, a table that has 148 million records took 27 seconds to move over using a medium-sized warehouse. Unfortunately, you cannot use Snowflake’s clone feature on a shared database.

Frequently Asked Questions

What is the difference between sharing data with existing Snowflake customers versus non-Snowflake customers?

Existing Snowflake customers bear the costs of any storage or compute incurred from querying or copying the shared database. For a non-Snowflake customer, the provider would create Reader Accounts and pay for all the costs incurred by those accounts. As the provider, you would be able to track account usage and bill the consumer if that was part of the set business agreement.

How fast would the data update for consumers?

Instant! The data is stored and shared on the cloud so the provider and consumer see the same data. The Secure Share is a metadata wrapper that points to the correct data that is still sitting with the provider. So any changes to the provider’s dataset would be reflected instantly from the consumer’s viewpoint.

Once the consumers can see the data in their account, what can they do with it?

They can query and run any analytics they desire such as Tableau or Sigma. If they wish to manipulate the data, they can copy that data into their own database, so they would have write access as.

Can I allow my users to see only selected tables or views?

Yes! Snowflake has a role-based security framework, so the Account Administrator can limit which roles are accessible to certain users. Roles are a collection of permissions granted on objects. Therefore, what a user can see depends on what permissions have been granted to the user’s role.

What if my consumers go overboard with how much they are using the Reader Account?

As the data provider for Reader Accounts you control usage. Set up Resource Monitors, which impose limits on the number of credits that virtual warehouses use within a specified interval or date range. When these limits are reached or are approaching, the Resource Monitor can trigger an alert and suspension of the warehouse.

Snowflake Cost Anti-patterns

Snowflake is still my favorite Analytical Database since the beginning of 2018 but as I often present in my live training sessions and webinars, WITH GREAT POWER (practically unlimited computing scale) comes GREAT RESPONSIBILITY.

In this article, I'll cover the TOP 3 Snowflake Cost Anti-patterns my Snowflake Cost Optimization team and I have come across after 3 years of analyzing hundreds of Snowflake Accounts.  I cannot begin to state how you should either invest in a PART or FULL-TIME Snowflake DBA focused on cost and organization or if you do not have that financial luxury then use our automated Snowflake Cost Optimization Service - Snoptimizer.  It's incredibly easy and low-cost to set up Snoptimizer compared to having these anti-patterns manifest (which I know happens on too many Snowflake Accounts based on our review of hundreds of them).  If you do not have cost guardrails like Resource Monitors enabled your Snowflake Compute Consumption Risk is high and it's honestly gross negligence as a data administration professional to allow this.

Let's go through the TOP 3 Snowflake Cost Anti-patterns.

Top 3 Anti-Patterns

The first Snowflake anti-pattern is by far the worst and happens all too often.

Snowflake Cost Anti-pattern #1

Sadly, we all too often see that Resource Monitors are not set up correctly.  Some Snowflake accounts have them set up but do not have them set up at an effective grain.  One anti-pattern is that the administrator sets a large credit-sized resource manager for the overall account and no other resources managers.  It is okay to have some Resource Monitors cover the account or multiple warehouses but we highly recommend having 1 Resource Monitor set for Daily monitoring for each warehouse with auto-suspend enabled once a credit limit is reached.  This is currently the only real solution to having guardrails on your Snowflake consumption.  Without doing this you are exposing your company and Snowflake account to significant cost risk.

An additional anti-pattern related to Resource Monitors that we see too frequently is Administrators do not want to be responsible for stopping the computer so they set up Resource Monitors with ONLY notifications.  The problem with this is that notifications are just that...ONLY something to notify you.  What if you only have 1-2 Snowflake Account Administrators and they are not monitoring the emails or web notifications frequently enough and a Large to 6XL warehouse comes online without auto suspend enabled?

Another problem as well is that Snowflake Administrators set up Resource monitors BUT do not attach them to a warehouse. This is the same as having a guardrail but it's not activated.  Ugh!

Finally, we also see Resource Monitors get set up but then Account Administrators who do not enable their email or notifications correctly.

Snowflake Cost Anti-pattern #2

Another major Snowflake Cost anti-pattern is related to storage.  We do not see this nearly as often as #1 but it can also be a cost risk danger if you do not understand the impacts of enabling longer Time-Travel settings on Snowflake.  If you have many of your tables with time-travel set to 30,60, or 90 days, but you don't need that much time travel and will never use it, then you should change those configurations to lower time-travel settings.

There are similar potential problems with any table that is frequently updating and changing data.  These types of data tables will challenge Snowflake's architecture because every data change requires recreating micro-partitions.  So if you have a 90-day time-travel set and you are changing a table with large amounts of rows/sizes every few minutes or hours then it's going to add up as all of those immutable micro-partitions for every change are saved for 90 days.  Also, remember by default Snowflake forces a 7-day fail-safe of storage.  So if you have Time-Travel set to 90 days then it's 97 days of storage you will pay for.

Snowflake Cost Anti-pattern #3

Setting a Warehouse to "Never" auto suspend or high auto suspend settings.  If you set a Warehouse to never suspend then you are creating a never-ending spend on a warehouse until you manually or through code suspend it.  If the warehouse size is only XS then this isn't incredibly horrible but if it's a larger size the costs can grow very fast and you lose all of the value of Snowflake's consumption-based pricing.


Conclusion for Snowflake Cost Anti-patterns:

These are the top 3 most dangerous Snowflake Cost Anti-patterns we have come across.  There are many others but they are typically not as severe as these. These Snowflake Cost Anti-patterns are real and introduce your company and yourself to sizable cost risks.  This is why we recommend using Snoptimizer or enabling Snowflake Best Practice Cost Optimization by your team. Especially set up Resource Monitors IMMEDIATELY or at least in the same data as your Snowflake Account is provisioned.

THE SNOWFLAKE SUMMIT RECAP – 2019

THE SNOWFLAKE SUMMIT RECAP – 2019

The first snowflake summit finally happened from June 3rd to 6th and lived up to the expectation of many people who were interested in the summit. The four days summit had more than two thousand attendees, one hundred and twenty presentations across seven tracks, seven keynote presentations, more than thirty hands-on labs, more than thirty-five theatre sessions, and more than thirty countries represented by the attendees.

A quick recap of the summit…

Day 1

The first day of the summit majorly involved attendees of the summit undertaking an essential snowflake training which ended with the trainees taking an exam. This was a smooth and exciting experience as people were placed in rooms where they had their background scripts and environments with snowflake representatives ready to help anyone out. The exam was made of two parts, the first part was made of multiple choices relating to the training done, and the second part was done upon passing the first part, which was practical. The practical involved creating a user, a database, and a table that loaded from a Google spreadsheet, and executing various transformations that would load in the final table.

Day 2

The significant aspects of the day involved making important announcements about new snowflake features. The features included snowflake being available on Google cloud, external tables, snowflake organizations, data replication, data exchange, and data pipeline. The significant announcements are explained below:

  •      Snowflake announced that it would be available on the Google platform for 2020. This would ensure that organizations using snowflake get seamless and secure data integration across various platforms, thus enabling them to choose the right vendor for their business. It will also be easy for customers to utilize Google's ecosystem of applications. Customers also can use the Google cloud platform and manage applications across multiple clouds.
  •      Snowflake also introduced new data pipeline features that allow customers to query data directly from their data lake on Azure Blob Storage or AWS S3 which enables them to maintain the data lake as the single source of truth.
  •      Snowflake's data exchange is currently available for viewing privately with public viewing being set for later in the year. The data exchange is free to join marketplace for enabling users to connect with data providers for seamlessly discovering assessing and generating insights from the user's data.

Day 3

The keynotes on the third day started with Alison Levine, who is the author of "on edge," giving an informative talk on leadership. The founders of snowflake Benoît Dageville, who is the current president of products, and Thierry Cruanes, who is the current CTO, also gave a talk on the reason for starting snowflake. They did this by referencing their vision of; "Simply load and query data". The day ended with Kevin O'Brien of Kiva.org and Julie Dodd of Parkinson's UK showing how data could be used to make the world a better place.

Day 4

The last day of the summit saw Matthew Glickman, the Snowflake VP of Customer and Product Strategy, giving a closing keynote on some of its customer's journey to be data-driven. Some of the customer representatives invited on stage included Brian Dumman, Chief Data and Analytics Officer, McKesson, Yaniv Bar-Dayan, Cofounder and CEO, Vulcan Cyber, and Michal Klos, Senior Director of Engineering, Indigo/Localytics. By the end of the summit, it was clear that the future of data had arrived with snowflake having the capability of providing trusted data solutions to its customers.

The 2020 summit will be better

The 2020 summit will be held on June 1st to 4th at the Aria Hotel in Las Vegas, which is a bigger venue. Considering the success of the snowflake 2019 summit, the 2020 summit will be more significant and will have more activities. I honestly can't wait for it.

Find out more about all the benefits Snowflake has to offer you and your business. Sign up for a free proof of concept!

SnowCompare

SnowCompare

SnowCompare is the easiest and fastest way to compare & deploy Snowflake data from one database or schema to another.
While Snowflake allows you to code and write SQL to compare data it's still regularly cumbersome for a regular user or analyst.
Zero Copy Cloning is so easy in Snowflake but what happens when you cloned a database several times and you want to understand the differences between the clone and the original database?
This is where SnowCompare comes in and makes this super easy to visually see the differences.
Get on the waiting list for this free tool!  We plan to release in October.

Find out more about all the benefits SnowCompare has to offer you and your business. Sign up for a free proof of concept!

SnowSheets

SnowSheets

SnowSheets allows you to connect Google Sheets to a Snowflake database.

You can:
  • View (select) Snowflake data within Google Sheets.
  • Create tables, update, insert, and delete rows from tables and keep Google Sheets synchronized with Snowflake.
  • Allows for easier editing of data within Snowflake.

Get on the waiting list for this free tool! We plan to release in September.

Find out more about all the benefits SnowSheets has to offer you and your business. Sign up for a free proof of concept!

Integrating Databricks with Snowflake

Overview:


Here is a practical guide to integrating Databricks with Snowflake. We will get you started with the basic setup and show you how easy it is to get the two of them connected to write and read data from each other.


Pre-Requisites:


1. You must have a Snowflake Account (the good thing is that this is easy!)– You get a 30-day free trial, including $400 of free credits. Open a Free Snowflake Account Setup here

2. You need to set up at least a Databricks Community edition (The Community Edition is free) – The Databricks Snowflake connector is included in Databricks Runtime 4.2 and above.


Try Databricks Free

You should have some basic familiarity with Dataframes, Databricks, and Snowflake.


At a high level, we are doing these main steps:

Step 1: Import a notebook that already has a shell of the code you need.

Step 2: Fill in the details in the notebook for your Snowflake database.

Step 3: Execute the 3 separate parts of the notebook which will be:

Step 4: Make the connection.

Step 5: Write a data frame to snowflake.

Step 6: Read a snowflake table back into a data frame.


Steps:


Okay. Now that you have a Databricks Account setup then log in. I’m going to assume you have the Community Edition so the login is here: (if you have the regular editions then login to the appropriate area).

https://community.cloud.databricks.com/login.html

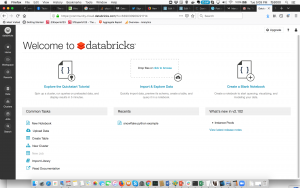
Then once you are logged in you should see a screen like this:


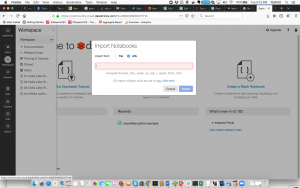
Go to the Workspace icon (It is the 3rd from the top on the left-hand side) Once you click on it then on the right there will be a dropdown arrow to the right of the menu item “Workspace”.  When you click there then click on Import and it should look like this:


Databricks Import URL


Then Choose the URL there and put in this notebook link and click the Import Button. https://docs.databricks.com/_static/notebooks/snowflake-python.html

  • This is one of my favorite parts about Databricks, they make it look easy to share Notebooks and be more organized.

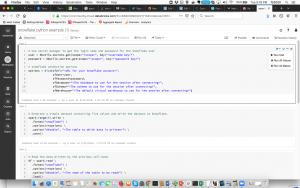
Once you have imported the notebook it should look like this:


Databricks Notebook to Snowflake


There are 3 main sections to this sample connector notebook from Databricks:


1.  The Snowflake connection:


You need to fill in all the details in blue. You should set up the data bricks secrets to start.

Then make sure you add the other appropriate details here (database, schema, warehouse):

  • You will notice on the image there is in the upper right a run button. If you have worked with Jupyter Notebooks this is very similar.


2.  Write Data to a Snowflake table:


Fill in the sections in blue. Mainly just what table you want to write to. If the table is not created then it will create it for you.  If you wish to carry out further tests with your data and create a data frame, you can modify this section accordingly: spark.range(5).write.


3.  Read Data to a Snowflake table:


Fill in the sections in blue. Mainly just what table you want to read from which is the one you just created.

This is a straightforward example that demonstrates how to connect Databricks and Snowflake. The process of connecting Spark outside of Databricks is also relatively easy but requires setting up the Spark to Snowflake Connector and the JDBC Driver. Fortunately, Databricks 4.2 and higher come with these already set up, which makes the process even smoother.

Find out more about all the benefits Snowflake has to offer you and your business.


Conclusion:


In conclusion, integrating Databricks with Snowflake is a simple process that can be done in just a few steps. By following the guide above, you can easily connect the two platforms and write and read data from each other. This integration opens up many possibilities for data analysis and business intelligence, making it a valuable tool for any organization.

How To Setup Confluent with Snowflake

What is Confluent in Snowflake?

Confluent is a data streaming platform based on Apache Kafka. It allows for the integration of different data sources and the processing of large amounts of data in real-time. In this document, the instructions are provided for setting up Confluent with Snowflake, a cloud-based data warehousing and analytics platform. The purpose of this integration is to move data generated in Confluent/Kafka into Snowflake for further analysis and insights.


How To Set Up Confluent with Snowflake:

Here is a practical guide to getting started with setting up Confluent with Snowflake

Pre-Requisites:

  1. To start, you'll need a Snowflake Account. Don't have one yet? Not to worry - you can sign up for a 30-day free trial with $400 credit at Free Snowflake Account Setup.
  2. This setup requires using Docker. (I’ll have separate instructions to do this without Docker later)
  3. You also need git.

Here we go – there are 3 main parts to this setup:

  1. Get this docker version of confluent/Kafka up and running.
  2. Create a topic on it to generate data for moving data into Snowflake.
  3. Setup the Kafka to Snowflake Connector as the Destination with the right Snowflake connectivity.

Part 1 – Get the docker version of Confluent/Kafka running

Okay…The first time it will take a few minutes to download… and you will see the output eventually like this:

If you want to verify that everything is up and running then execute this command:

Part 2 – Create a topic to send Data to Snowflake. Generate data for it with the DataGen functionality.

Let’s go… execute these commands in sequence:

Create a topic:

Generate data for the topic: Let’s first configure a JSON file for the data we want to create. Use whatever editor you want and create this file u.config.

I’m using vi u.config and pasting this in there:

u.config details

Part 3 – Download the Kafka to Snowflake Connector and configure it.

So you have Confluent/Kafka up and running. You have data generated into a topic.

So now just download the magical Kafka to Snowflake connector here: https://mvnrepository.com/artifact/com.snowflake/snowflake-kafka-connector/0.3.2 I’m sure by the time I publish this the version will change but for now, assume it’s this one.

Once you have the file in the same directory we have been using for everything then copy it to the connected virtual machine where it needs to be to work.

You now need to create the configuration file to set up the Connector and the Sink associated with it that connects to the Snowflake Database.  This does assume you have already set up your RSA key.  You do have to fill in 6 of the settings below to have this setup for your specific configuration. Again, use your favorite editor.  I’m using:vi connector_snowflake.config and entering in my specific details.

connector_snowflake.config details

Almost there. Now use this configuration file to set up the sink.

Now in a few seconds or minutes if you set up everything correctly the topic should be written on the Snowflake table. Go into the database and schema you connected to and you should be able to execute something like:

Now you should see data flowing from Kafka to Snowflake. Enjoy!

Find out more about all the benefits Snoptimizer has to offer you and your business. Sign up for a free proof of concept!

A New Era of Cloud Analytics

A NEW ERA OF CLOUD ANALYTICS WITH SNOWFLAKE AS THE HADOOP ERA ENDS

Hadoop was regarded as a revolutionary technology that would change data management and completely replace data warehousing. Such a statement is partly accurate but not entirely true since it has not been the case ever since cloud solutions came into the picture. Hadoop mostly flourishes with projects that involve substantial data infrastructure, meaning it was more relevant around a decade ago when most data analysts (more…)

Not On The High Street: Improving customer experience with Snowflake

Not On The High Street: Improving customer experience with Snowflake

Companies like notonthehighstreet.com are taking their customers' experience to the next level, with an online marketplace delivering unique products and services in a singularly convenient way. Without speedy data delivery though, as attested to by their Director of Data in this video, this marketplace just wouldn't keep their customers coming back for more. Their countless partners benefit from this as well, but (more…)

Snowflake’s Differentiating Features

What are the features of Snowflake that differentiate it from all its competitors?  I started this list in 2018 and it continues to evolve. Sure, I am a Snowflake Data Superhero and longtime Snowflake Advocate. I do try to be objective though.  Also, I have had a long long career of partnering with new technologies during my 19 years of running a successful consulting firm.  I have to state that most vendors and technologies do NOT impress me at all.  While I partnered with Microsoft (we were a gold partner for many years) and many others, the reality is that most of their technology was not a game-changer like an internet or Netscape (the first browser). They typically were solid technology solutions that helped our clients.  When I discovered Snowflake at the beginning of 2018 when looking to build a custom CDP for a Fortune 50 company I realized this technology and this architecture was going to be a game changer for the data processing industry, especially within BIG DATA and ANALYTICS.  

Snowflake's Differentiating Features (2018 or before)

  1. Concurrency and Workload Separation [enabled by the Separation of Compute from Storage.]  [huge! for the first time, you could completely separate workloads and not have the traditional concurrency challenges of table locking or ETL jobs COMPETING with Reporting or Data Science jobs.]
  2. Pay-as-you-go pricing (also, named Consumption-based pricing) - This enabled for the very first time that startups and medium-sized businesses could get true cloud BIG DATA scale at an amazingly affordable price.  This never happened before this.
  3. Time-Travel.  (Based on write-ahead Micro-partitions.)
  4. Zero-Copy Cloning.
  5. True Cloud Scale.  DYNAMIC (the way it should be!) In and Out Scaling with Clusters.
  6. True Cloud Scale.  Up and Down.  [code or manual still at this point.  Switching between XS to 4XL warehouse t-shirt sizes]
  7. Data Sharing (this may be my favorite feature.  Data Sharing is transforming industries)
  8. Snowpipe.  The ability to handle the ingestion of streaming data in near real-time.
  9. Data Security.  Encrypted Data from end-to-end.  While some other vendors had some of this Snowflake made security first in the cloud.
  10. Semi-Structured Data ease of use.  Snowflake has been the easiest way we have been able to have JSON and other
  11. Lower Database Administration.   Amazingly, no database vendor didn't automate the collection of database/query statistics and automated indexing/pruning before.  Huge STEP forward.   [I DO NOT agree with Near-Zero Administration - this is not true especially as Snowflake transformed to a data cloud and added on tons and tons of additional features which have some additional administration requirements]

Snowflake's Differentiating Features (2019-2021)

  1. Data Exchange and then Data Marketplace.
  2. Cloud Provider Agnostic. Move to support Azure as well as GCP in addition to AWS.
  3. Data Clean Room V1. Capability to use Secure User Defined Functions within Data Shares.
  4. Data Governance Capabilities.
  5. Integrated Data Science with Snowpark. [still needs work!]
  6. Unstructured data. Amazingly now

Snowflake's Differentiating Features (2022)

*I'm going to wait until December 2022 to finalize this list.  There were some amazing announcements.

One item though that I"m finding awesome is  Access to the SNOWFLAKE.ORGANIZATION_USAGE Schema (I think it's still in preview but this makes Organizational reporting so much easier.  Previously we build tools that would log into each account and go to the SNOWFLAKE.ACCOUNT_USAGE schema views within each count and pulls it back to a centralized location.  Sure it worked but it was a pain.

To be fair and not a complete Snowflake Advocate, Snowflake needs a reality check right now.  Snowflake Summit 2022 was an amazing amount of announcements.  (Even though a focused business person could argue... what is Snowflake now?  A Data Cloud?  A data application development environment?  A Data Science and ML tool?  My heart goes out to the Account Executives.  They have to focus first when they do capacity deals on the true value of what Snowflake provides today!)   Also, the true reality is many of the significant announcements remind me of my Microsoft Gold Partner days.... lots of Coming Soon.... but not that soon.  Many of these feature announcements will not be truly available until 2023.

Snowflake's Differentiating Features (2023)

Coming next year :). you just have to wait!

Summary

Since 2018, I was getting questions from so many colleagues and customers about why is Snowflake better than the on-prem databases they were using.  Or I was getting tons of questions about why Snowflake is different than Redshift or Big Query or Synapse.  

So this article is my attempt to explain to both business users of data and data professionals (from architects to analysts) why Snowflake is different from any other technology.

GigOm

GigOm

With superior performance and the most hands-off model of ownership, Snowflake is the epitome of a data warehouse as a service. The model, cost, features, and scalability have already caused some to postpone Hadoop adoption. In its multicluster, scale-out approach, Snowflake separates compute from storage. It is fundamental to the architecture where multiple, independent compute clusters can access a shared pool of data without resource contention. Customers pay for what is used without a stairstep approach to resources and pricing.

  • The cost model is simple at terabytes per year or computing hours.
  • For primary storage, Snowflake uses Amazon’s Simple Storage Service (S3). Snowflake also uses an SSD layer for caching and temp space.
  • Snowflake customers deploy a wide array of modern BI and visualization tools, some utilizing the ODBC and JDBC connectivity.
  • Snowflake also offers a web interface.
  • Snowflake SQL includes support of objects in JSON, XML, Avro, and Parquet using a special data type that can handle flexible-schema, nested, hierarchical data in table form.
  • There are no indexes either, as zone maps are used for an abstract understanding of data in the database. SQL extensions include UNDROP and CLONE. Features include result set persistence and automatic encryption.
  • No downtime is required for anything including upgrades or cluster expansion.
  • Concurrency, a clear challenge in database scale-out, is a focus at Snowflake.  Their automatic concurrency scaling is a single logical virtual warehouse composed of multiple compute clusters split across availability zones.
  • Finally, Snowflake has a native connector for Spark built on the Spark Data Sources API.

Snowflake has jumped constraints found in databases from earlier development and honed a very promising cloud analytic database. Eminently elastic on a foundation of separation of computing and storage, Snowflake offers as close to a hands-off approach as we found. Snowflake is market-leading in what you would want for a multi-purpose cloud data warehouse analytical database.

Source - GigaOm Sector Roadmap: Cloud Analytic Databases 2017

Snowflake vs Netezza

Snowflake vs Netezza

Fifteen years ago, IBM introduced an appliance-based, on-prem analytics solution known as Netezza. It was purpose built, load ready, and met a lot of the needs of the day (back when on-prem was still largely the preferred choice for data warehousing solutions). One could say IBM really hit the ball out of the park, and Netezza has definitely enjoyed a good, solid run since then, but that was fifteen years ago, and times have (more…)