


Overview:
Here is a practical guide to integrating Databricks with Snowflake. We will get you started with the basic setup and show you how easy it is to get the two of them connected to write and read data from each other.
Pre-Requisites:
1. You must have a Snowflake Account (the good thing is that this is easy!)– You get a 30-day free trial, including $400 of free credits. Open a Free Snowflake Account Setup here
2. You need to set up at least a Databricks Community edition (The Community Edition is free) – The Databricks Snowflake connector is included in Databricks Runtime 4.2 and above.
You should have some basic familiarity with Dataframes, Databricks, and Snowflake.
At a high level, we are doing these main steps:
Step 1: Import a notebook that already has a shell of the code you need.
Step 2: Fill in the details in the notebook for your Snowflake database.
Step 3: Execute the 3 separate parts of the notebook which will be:
Step 4: Make the connection.
Step 5: Write a data frame to snowflake.
Step 6: Read a snowflake table back into a data frame.
Steps:
Okay. Now that you have a Databricks Account setup then log in. I’m going to assume you have the Community Edition so the login is here: (if you have the regular editions then login to the appropriate area).
https://community.cloud.databricks.com/login.html
Then once you are logged in you should see a screen like this:
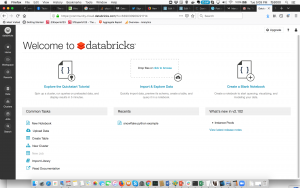
Go to the Workspace icon (It is the 3rd from the top on the left-hand side) Once you click on it then on the right there will be a dropdown arrow to the right of the menu item “Workspace”. When you click there then click on Import and it should look like this:
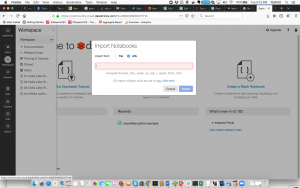
Then Choose the URL there and put in this notebook link and click the Import Button. https://docs.databricks.com/_static/notebooks/snowflake-python.html
- This is one of my favorite parts about Databricks, they make it look easy to share Notebooks and be more organized.
Once you have imported the notebook it should look like this:
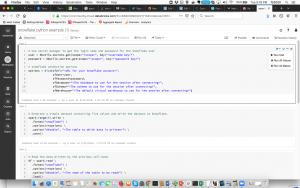
There are 3 main sections to this sample connector notebook from Databricks:
1. The Snowflake connection:
You need to fill in all the details in blue. You should set up the data bricks secrets to start.
Then make sure you add the other appropriate details here (database, schema, warehouse):
- You will notice on the image there is in the upper right a run button. If you have worked with Jupyter Notebooks this is very similar.
2. Write Data to a Snowflake table:
Fill in the sections in blue. Mainly just what table you want to write to. If the table is not created then it will create it for you. If you wish to carry out further tests with your data and create a data frame, you can modify this section accordingly: spark.range(5).write.
3. Read Data to a Snowflake table:
Fill in the sections in blue. Mainly just what table you want to read from which is the one you just created.
This is a straightforward example that demonstrates how to connect Databricks and Snowflake. The process of connecting Spark outside of Databricks is also relatively easy but requires setting up the Spark to Snowflake Connector and the JDBC Driver. Fortunately, Databricks 4.2 and higher come with these already set up, which makes the process even smoother.
Find out more about all the benefits Snowflake has to offer you and your business.
Conclusion:
In conclusion, integrating Databricks with Snowflake is a simple process that can be done in just a few steps. By following the guide above, you can easily connect the two platforms and write and read data from each other. This integration opens up many possibilities for data analysis and business intelligence, making it a valuable tool for any organization.
